Difference between revisions of "BioMart Tutorial 2011"
(→Alternative way to deploy) |
(→Using deployed application) |
||
| Line 305: | Line 305: | ||
| − | == | + | == 4.5 Exploring our first BioMart data portal == |
| − | + | You can choose some attributes and hit "GO" button to get some result. | |
= Configuring mart (MartConfigurator) - more advanced = | = Configuring mart (MartConfigurator) - more advanced = | ||
Revision as of 03:02, 14 October 2011
TODO: add small screenshot to exercises?
TODO: REST?
TODO: get svn revision
TODO: recreate image
TODO: upload image
TODO: test each commands again
| {{#icon: Biomart250.png|BioMart|200|BioMart}} {{#icon: 170px-October2011Logo.png|October 2011 - Toronto |
2009 GMOD Summer School - Toronto, Canada}} | BioMart Session 2011 GMOD Community Meeting & |
__NOTITLE__
This tutorial walks you through how to install and configure a local installation of BioMart.
Contents
- 1 1. Setting up the virtual machine
- 2 2. Downloading & Installing BioMart
- 3 3. Building mart
- 4 4. Configuring a data portal to expose the mart using MartConfigurator
- 5 Configuring mart (MartConfigurator) - more advanced
- 6 More exercises with MartConfigurator
- 7 Querying a BioMart server via REST API
1. Setting up the virtual machine
1.1 Import and start the VM
- We have create a virtual machine (VM) image using Oracle's VirtualBox software tool. The image file is in OVF/OVA format, you should be able to set up the VM using VirtualBox or VMware player. At this time, you should have one of them installed already.
- We will be passing around USB memory sticks that contain the image file, please copy it to your laptop.
- Import and start the VM using VirtualBox:
- Start VirtualBox
- Import image with: (from the menu bar) File --> Import Appliance
- Navigate to the .ova file you just copied from the USB key and follow on screen instructions
- After imported, choose to start the VM by clicking the Start button
1.2 Accounts that you will need for this tutorial
- Linux:
- username: biomart
- pasword: biomart
- MySQL:
- username: biomart
- pasword: biomart
2. Downloading & Installing BioMart
Two components are necessary for this tutorial: MartBuilder from an older version of BioMart release (0.7), and MartConfigurator is from the most recent development code snapshot (0.8)
Installation of MartBuilder and MartConfigurator has already been done on the VM image under ~/biomart_0_7.template and ~/biomart_0_8.template, but we are going to it yourself in the tutorial.
2.1 Installing Biomart 0.7 - MartJ package
MartJ contains applications necessary to create a Mart: MarBuilder and MartRunner.
Download & extract tarball content with:
 $ cd
 $ mkdir biomart_0_7
 $ cd biomart_0_7
 $ wget ftp://anonymous@ftp.ebi.ac.uk/pub/software/biomart/martj_current/martj-bin.tgz
 $ tar zxvf martj-bin.tgz  # creates "martj-0.7" directory
 $ cd martj-0.7
2.2 Installing Biomart 0.8
Checkout a specific revision of the current development code from SVN repository as below:
 $ cd
 $ mkdir biomart_0_8
 $ cd biomart_0_8
 $ svn co -r 10499 https://code.oicr.on.ca/svn/biomart/biomart-java/branches/oct_3_2011 martconfigurator
 $ cd martconfigurator
 $ ant # build project with ant; in the future, you may use: ant clean dist
3. Building mart
This section will show you how to create a mart database from a normal relational database using MartBuilder. We use a simplified VEGA database as a start.
3.1 Creating mart schema using MartBuilder
3.1.1 Start MartBuilder
 $ cd ~/biomart_0_7/martj-0.7
 $ bin/martbuilder.sh
MartBuilder should open (see screenshot below):

3.1.2 Add a source schema
In the menu bar, choose Schema->Add to open the dialog to add a schema.
Fill in the fields with the follow values as shown in the screenshot below:
- Name: vega
- Database type: MySQL
- Using MyISAM: checked
- Host: localhost
- Port: 3306
- Database: mini_hsap_vega
- Schema: mini_hsap_vega
- Username: biomart
- Password: biomart
ignore the last 3 fields (used for partitioning which is not covered in this tutorial)

Click the Test button to ensure we can connect to the database. Click the Add button in order to proceed with the dataset description.
You should now see the source database shown in MartBuilder (see screenshot in the next section).
3.1.3 Select main table(s) and generate mart schema
We are going to create a dataset based on the tables "gene" and "transcript" (as main and submain tables respectively, as described in presentation)
- Right-click on the "gene" table
- Click on Create dataset
the gene table should be highlighted already as we arrived on the current menu by clicking on it
- add the transcript table (standard Ctrl + click)
- Press the Create button

This shows the mart schema (reverse star) of the dataset that has been just create.

3.2 Materializing the mart
Your dataset does not actually exist yet. In order to create it, you need to generate the SQL for it then run that SQL against your database.
BioMart offers a tool (MartRunner) that does that for you, using JDBC. The SQL used is as ANSI-compliant as possible, with some exceptions based on the RDBMS in use.
3.2.1 Preparing database and start MartRunner
- We now going to transform the source data into target dataset, but before that, we have to create a target database:
$ mysql -hlocalhost -P3306 -ubiomart -pbiomart -e "create database mini_hsap_vega_mart"
- Start MartRunner using port 9876 with:
 $ cd ~/biomart_0_7/martj-0.7/
 $ bin/martrunner.sh 9876
MartBuilder will send the materialization SQL to MartRunner through that port (in this example, 9876), and MartRunner will execute the transformation SQL.
3.2.2 Starting schema transformation from MartBuilder
We go back to MartBuilder, and click on the Build Mart button to pop up the following dialog:
- Datasets: gene
- Schema partitions: ignore
- Target database: mini_hsap_vega_mart (the database we just manually created)
- Target schema: mini_hsap_vega_mart (same as database for MySQL)
- Send SQL to: MartRunner
- MartRunner host name: localhost
- MartRunner port number: 9876 (the one we just arbitrarily chose because it was free)
- Database server name: localhost
- Database server port number: 3306

Click on the Generate SQL button

Click on the "Start job" button
3.2.3 Monitoring MartRunner transformation progress

Ensure everything is successful, ie, displayed in green font!
You now have a mart database created from a 3NF normalized source database, and it's ready for configuring using MartConfigurator.
4. Configuring a data portal to expose the mart using MartConfigurator
This section will show you how to use MartConfigurator to configure a data portal web server that exposes the created VEGA mart to end users for querying.
4.1 Start MartConfigurator
Start MartConfigurator with the following command:
 $ cd ~/biomart_0_8/martconfigurator
 $ dist/scripts/martconfigurator.sh
The panel on the left corresponds to data sources; in our case we will add the mart that has been just created: mini_hsap_vega_mart
The panel on the right corresponds to access points for those data sources that will be exposed to web users.

4.2 Add our own mart: mini_hsap_vega_mart
Click on the Add Mart button to add a datasource

- Wizard step 1 of 4:
- source profile: vega (anything will do)
- source type: RDBMS Mart

- Wizard step 2 of 4:
- RDBMS: MySQL (keep MyISAM checked)
- Host: localhost
- Port: 3306
- User: biomart
- Password: biomart
- Database: can leave empty for now

- Wizard step 3 of 4:
Select mini_hsap_vega_mart, the mart that we just built using MartBuilder/MartRunner and based upon the mini_hsap_vega database

- Wizard step 4 of 4:
- Create naive configuration
- Choose the main table "gene__gene__main"

- Now we should have our own mart added
4.3 Creating Access Point
Simply drag-and-drop the mart from the left side (Source panel) to anywhere on the right side (Portal panel).
It will add an access point to the mart. The default name is mini_hsap_vega_mart_ap, ap standing for Access Point, but you can give it a name of your choice.
Note that you can also create an access point by clicking the Add Access Point button. You would then be given a list of the existing marts to choose from.

4.4 Deploying the data portal, ie, the BioMart Server
To deploy the web based data portal, simply click on Start Server button on the top right corner.
- When the Start Server button is click, if the current configuration (registry) has never been save, you will be prompted with a dialog for saving the current registry.
- Save the registry under /home/biomart/biomart_0_8/martconfigurator/registry/
- The data portal will be deployed on your local machine using port 9000 by default.
- Your web browser should open and pointing to http://localhost:9000/ automatically when the server is ready.
- Note the URL: localhost:9000/web (default)

- To stop the server use the Stop Server button in the upper right corner
There is also a command-line approch to starting/stopping the server using:
 $ dist/scripts/biomart-server.sh start
 $ dist/scripts/biomart-server.sh stop
but that will not be covered here (involves the registry in a specific directory first)
4.5 Exploring our first BioMart data portal
You can choose some attributes and hit "GO" button to get some result.
Configuring mart (MartConfigurator) - more advanced
From the configuration editor (see previous section)
Configuration editor
Description
- top panel: Configuration tree
- Show sources view: where one can modify config in a way that will affect all access points
- Show access point view: where one can modify individual access point's configs specifically
- Show both: most typical usage
- top-left panel: source view
- top-right panel: access point view
- bottom panel: Editor frame
- bottom-left panel: property names
- bottom-right panel: property values

Notes
Only properties whose name appears in blue font can be modified.
Each view has a Find search box that allows to quickly find attributes/filters based on their names
Also very convenient, the attributes and filters in each view offer an Show in the [opposite view] item in their context menu. It filters the opposite view side to show the counterpart filter/attribute
TODO merge whole section to exercices below == Containers == Typical properties that can be changed: * displayname * description * hide: whether attribute should be hidden or not * enableselectall: offer checkbox allowing selection of all attributes/filters in the given container == Attributes == Typical properties that can be changed: * displayname * description * hide * linkouturl: to make result values linkable to an external resource * datatype: String, Integer, Float, Boolean (useful mostly for reordering) == Filters == Typical properties that can be changed: * displayname * description * type (covered in the next section) * qualifier: whether to use "=", "<=", ">=", "LIKE" operations * spliton: separator for filter list values (see below) == Filters types == === Regular filters === Typically used to (suprisingly) filter data based on values of interest (for instance a specific gene, or location, or type, ...) === Filter lists === They are considered filter themselves, but actually contain a list of regular filters === Linking === Set Filter typesSet Attribute URLSelect GUI type Creating Links between sources If two data sources contain common information (e.g. a Gene/Protein ID), this can be used to create a link, allowing filters and attributes from one data source to appear in the other. These are called “pointer attributes” and “pointer filters,” and the attribute or filter to which they point is called the “target. ”To add a pointer to an access point, double click on that access point in the portal tab to edit it. In the top left corner of the editing window, click on the Import from sources button. You will be given a list of the existing data sources to choose which one you would like to make an access point for. After giving the new access point a name of your choice, it will appear in the GUI tab. Double-clicking on the access point icon will open a new window that allows you to modify the access point. References
More exercises with MartConfigurator
Rename 'default' GUI tab to "Form"
- TODO: explain GUI tab
- Right-click on the tab --> Rename
- enter new name: "Form"
Add new GUI tab
- Click on the "+" sign next to the latest GUI tab
- Enter name of the new tab: "Wizard"
- Right-click on the newly created tab --> Set GUI type --> MartWizard
Add a URL-based marts source
- Add remote mart (URL Mart) Using backward compatibility (from previous BioMart versions: <= 0.7)
- In the Source view: Add Mart
- Select URL Mart --> Next
- Input the following values:
- Protocol: http
- Host: www.biomart.org
- Port: 80
- Path: /biomart/martservice
- Choose source: "vega (url)" --> Next (we will only need "REACTOME" later)
- Select all 3 datasets and click Next
- Uncheck import each datasets to individual marts, one dataset per mart --> Finish
- Backward compatibility is run in the background in order to convert a mart configuration in 0.7 format to one in 0.8
- A datasource called "gene_vega" should appear on the right-hand side panel (datasource panel)
- Reproduce the same process for "REACTOME (url)", we will need it later
Add access points for the URL marts
- For both "vega" and "REACTOME", add access points to the "Form" GUI tab
- For both "vega" and "REACTOME", add access points to the "Wizard" GUI tab
Re-deploy server
- observe changes
Attributes
- Attribute linkouturl:
- TODO: example
- Attribute datatype:
- TODO: example
Filters
- Single select: "Chromosome"
- Open the configuration panel and choose Show both view
- In the Source view, search for the filter called "Chromosome" (Using the Find button)
- Change the type to singleSelect in the bottom-left panel (property editor for the Source view)
- Multi-select: "Gene type"
- In the Source view, search for the filter called "Gene type" (Using the Find button)
- Change the type to multiSelect in the bottom-left panel (property editor for the Source view)
- Dropdown options: "Chromosome" & "Gene type"
- Right-click on the filter of interest ("Chromosome" & "Gene type")
- Select Dropdown options in the menu
- For each dataset (hsapiens, mmusculus, drerio), click on the Update button in order to populate the values based on the database content
- Note that one may also manually add/remove values
- Composite filter: "Multiple Chromosomal Regions"
- In the Source view, search for the filter called "Multiple Chromosomal Regions (Chr:Start:End:Strand)" (Using the Find button)
- Change the following properties:
- type: upload (temporary name - under development)
- spliton: ":" (filter values are separated by a colon - do not include the quotes obviously)
- operation: and (only one available for now)
- filterlist: chromosome_name,start,end,strand (the 4 regular filters composing this composite filter)
- Boolean filter list: no covered here
Importing attribute
- We want to add a pathway attribute to the vega "Form" GUI (of MartForm type). In order to do that we must:
- Under the "Form" GUI tab, double-click on the "gene_vega_ap" access point to open configuration dialog for it
- It is important to open "gene_vega_ap" first as opposed to "pathway_ap", since we are going to add a "pathway" attribute to "gene_vega" and not the opposite
- Use the Show both view
- On the right-hand side (Access Point view), select the "root --> Attributes" container
- Right-click --> Add container
- Type in name, for instance "Pathway" since we're importing a pathway attribute
- On the left-hand side (Source view), change source to pathway
- In the Source view, search for the filter called "Pathway name" (Using the Find button)
- Drap-and-drop the selected attribute on the left-hand side ("Pathway name") into the newly created container in the right-hand side ("Pathway")
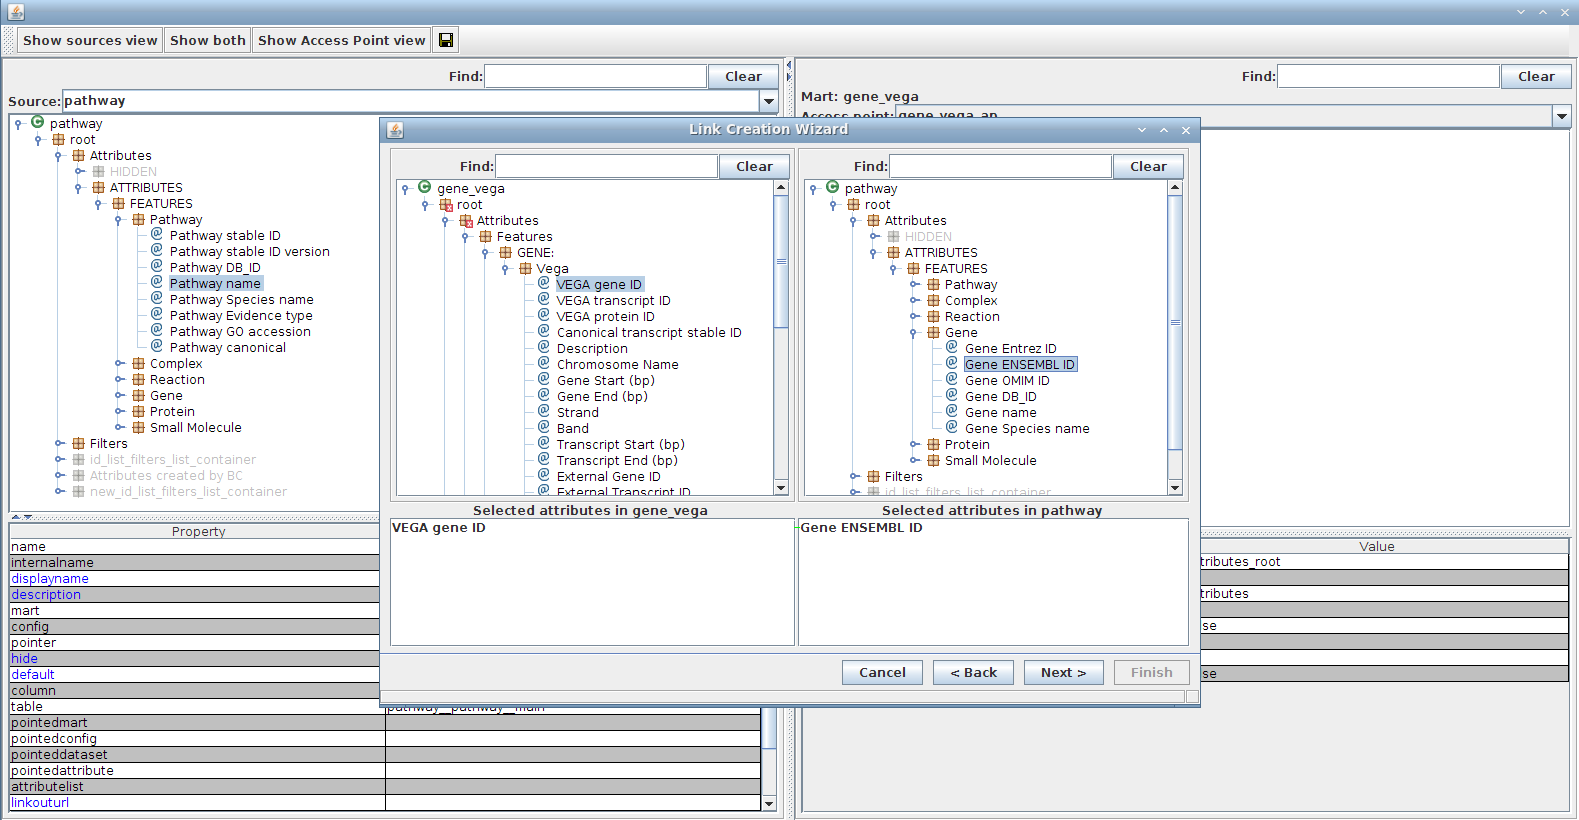
- Note: this will open the link dialog as we need to specify how to link those 2 datasets
- You can keep default link name ("pathway-gene_vega-link") and click Next
- Choose attribute(s) to join on (this should not be the same attribute as the one we are importing as it would not add any information, although nothing prevents it)
- left-hand side: In the Source view, search for the filter called "hsgene" (Using the Find button)
- Double-click on it to add it
- right-hand side: In the Access Point view, search for the filter called "Gene ENSEMBL ID" (Using the Find button)
- Double-click on it to add it
- Note that one could link on more than one attribute provided that there are an equal number of attributes on each side
-
- Keep default setting for the next page and Finish
- The newly added attribute should now show in the gene_vega_ap access point
- Re-deploy the server and observe behavior of the imported pathway attribute

Importing filter
TODO: more
- Follow the same steps as with "Pathway name" attribute for its counterpart filter ("root --> Filters --> FILTERS: --> FEATURES: --> Pathway --> Pathway name")
- The link already exists so there will be no link creation dialog opening
- Re-deploy the server and observe behavior of the imported pathway filter
Querying a BioMart server via REST API
MetaData queries
http://localhost:9000/martservice/marts
http://localhost:9000/martservice/datasets?mart=gene_vega
http://localhost:9000/martservice/accesspoints?datasets=&mart=gene_vega
http://localhost:9000/martservice/attributes?dataset=hsapiens_gene_vega&mart=gene_vega
http://localhost:9000/martservice/filters?dataset=hsapiens_gene_vega&mart=gene_vega
Data query
<xml> <Query processor="TSV" header="true" limit="-1" client="webbrowser"> <Dataset name="hsapiens_gene_vega" config="gene_vega_ap"> <Filter name="chromosomal_region" value="2:1000000:2000000:1,4:9000000:11000000:-1"/> <Filter name="biotype" value="protein_coding"/> <Attribute name="vega_gene_id"/> <Attribute name="vega_transcript_id"/> <Attribute name="vega_translation_id"/> <Attribute name="chromosome_name"/> <Attribute name="start_position"/> <Attribute name="end_position"/> <Attribute name="strand"/> <Attribute name="band"/> </Dataset> </Query> </xml>
Paste this piece of XML in a web browse address as:
http://localhost:9000/martservice/results?query=paste_query_xml_string_here
To read more about BioMart, refer to the recent articles describing the BioMart software and its applications.
1. Zhang J, Haider S, Baran J, Cros A, Guberman JM, Hsu J, Liang Y, Yao L, Kasprzyk A. BioMart: a data federation framework for large collaborative projects. Database (Oxford). 2011 Sep 19:2011:bar038.
2.Guberman JM, Ai J, Baran J., et al. BioMart Central Portal: An Open Database Network for the Biological Community. Database (Oxford). 2011 Sep18;2011:bar041.
3. Zhang J, Baran J, Guberman JM, Haider, S, Hsu J, Liang Y, Rivkin E, Wang J, Whitty B, Wong-Erasmus M, Yao L, Kasprzyk A. International Cancer Genome Consortium Data Portal - a One-stop Shop for Cancer Genomics Data. Database (Oxford). 2011 Sep19;2011:bar026.