GMOD
GBrowse NGS Tutorial

This GBrowse Next Generation Sequencing tutorial was presented by Dave Clements at the Bioinformatics Australia 2009 (BA2009), October 2009. The most recent GBrowse tutorial can be found at the GBrowse Tutorial page.
This tutorial walks you through how to configure the GBrowse genome browser to display Next Generation Sequencing (NGS) data using the SAMtools GBrowse adaptor, Bio::DB::Sam.
Contents
- 1 VMware
- 2 Caveats
- 3 Introduction
- 4 How the Starting Image was created
- 5 Start
- 6 Adding Human Data
- 7 Add Short Read Data
VMware
This tutorial was taught using a VMware system image as a starting point. If you want to start with the same system, download and install the Starting image. See VMware for what software you need to use a VMware system image, and for directions on how to get the image setup and running on your machine.
The starting image used for this tutorial is a modified copy of the one used at the start of the 2009 GMOD Summer School - Europe. See below for what was added to the starting image for this tutorial.
| Download |
|---|
| Starting Image Username: gmod |
Caveats
Important Note
This tutorial describes the world as it existed on the day the tutorial was given. Please be aware that things like CPAN modules, Java libraries, and Linux packages change over time, and that the instructions in the tutorial will slowly drift over time. Newer versions of tutorials will be posted as they become available.
Introduction
The tutorial will show how to display next generation sequence (NGS) data in GBrowse 2 using SAMtools. We’ll use the example human data that comes with SAMtools to do that. First we’ll load the reference sequence and some gene models.
How the Starting Image was created
The starting VMware image was created by starting with the starting image used in the 2009 GMOD Summer School - Europe. Several key prerequisites, including GBrowse 2 and SAMtools, were then installed on that, and then the starting image was created.
GBrowse 2 is already up and running on the image. This tutorial tells you how to add human data to the default installation, and then how to add NGS data to it, in the form of a Bio::DB::Sam/SAMtools database.
Passwords
- Login: gmod
- Password: gmod
- MySQL root password: none
Fluxbox
The VMware uses the minimal Fluxbox GUI. Some details will be explained here.
Prerequisites
This sections describes what additional prerequisites were installed on the starting image to enable GBrowse 2 and SAMtools.
Everything described in this section has already been installed on the starting image. This section is merely provided for your information.
Misc
This section describes the installation Synaptic is a graphical version of the apt-get package manager for Debian based systems. Emacs is my preferred Linux Text Editor, but any will do.
sudo apt-get install synaptic
sudo apt-get install emacs
Now that we have synaptic, I’ll use it to upgrade every package in the system. This is necessary because several months have passed since the Europe summer school, and I want to get the latest version of everything I have:
startx
This launches the Fluxbox graphical windows manager. Now start a terminal by right clicking anywhere on the screen and selecting
Shell → Bash
In the newly launched shell, run synaptic:
sudo synaptic
and update everything:
- Click on Reload
- Click on Mark all Upgrades
- Click on Apply
And the apply step runs for ages. Once that finishes, restart the virtual machine.
Bio::Graphics Prerequisites
sudo perl -MCPAN -e shell
install Text::ParseWords
quit
Don’t install Bio::SCF. It has to do with Staden trace visualization. We won’t be showing any.
GBrowse 2 Prerequisites
From the shell
sudo apt-get install build-essential
sudo apt-get install libgd-gd2-perl
sudo apt-get install libjson-perl libjson-any-perl
sudo apt-get install mysql-client libmysqlclient15-dev
Bio::Graphics
Download the latest Bio::Graphics from CPAN.
cd
mkdir BA2009
cd BA2009
mkdir BioGraphics
cd BioGraphics
wget http://mirrors.gossamer-threads.com/CPAN/authors/id/L/LD/LDS/Bio-Graphics-1.982.tar.gz
tar xzvf Bio-Graphics-1.982.tar.gz
cd Bio-Graphics-1.982/
perl Build.PL
./Build
./Build test
sudo ./Build install
Ignoring Bio:SCF warnings. This install process takes 1-2 minutes.
GBrowse 2
cd ~/BA2009/
mkdir GBrowse2
cd GBrowse2
wget http://mirror.its.uidaho.edu/pub/cpan/authors/id/L/LD/LDS/GBrowse-1.9971.tar.gz
tar xzvf GBrowse-1.9971.tar.gz
cd GBrowse-1.9971/
perl Makefile.PL
...
Checking prerequisites...
 - ERROR: Cache::MemoryCache is not installed
...
Oops.
sudo perl -MCPAN -e shell
install Cache::MemoryCache
...
Appending installation info to /usr/local/lib/perl/5.8.8/perllocal.pod
  JSWARTZ/Cache-Cache-1.06.tar.gz
  /usr/bin/make install UNINST=1  -- OK
exit
perl Makefile.PL
...
Installing /usr/local/bin/gbrowse_clean.pl
Writing /usr/local/lib/perl/5.8.8/auto/GBrowse/.packlist

***INSTALLATION COMPLETE***
Load http://localhost/gbrowse2 for demo and documentation
And the rest are optional prereqs.
./Build test
**Beginning interactive configuration**
Directory for GBrowse's config and support files? [/etc/gbrowse2]
Directory for GBrowse's static images & HTML files? [/var/www/gbrowse2]
Directory for GBrowse's temporary data [/var/tmp/gbrowse2]
Directory for GBrowse's example databases [/var/www/gbrowse2/databases]
Directory for GBrowse's CGI script executables? [/usr/lib/cgi-bin/gb2]
Internet port to run demo web site on (for demo)? [8000]
Apache loadable module directory (for demo)? [/usr/lib/apache2/modules]
User account under which Apache daemon runs? [www-data]
Automatically update Apache config files to run GBrowse? [y]
Automatically update system config files to run gbrowse-slave? [y]

**Interactive configuration done. Run './Build reconfig' to reconfigure**
Writing config notes to blib/lib/GBrowse/ConfigData.pm
...
All tests successful.
Files=8, Tests=341, 23 wallclock secs ( 0.00 usr  0.11 sys +  3.87 cusr  2.27 csys =  6.25 CPU)
Result: PASS
sudo ./Build install
Test it at http://172.16.108.129/gbrowse2/
GBrowse 2 is installed and the default datasources appear to work.
SAMtools
Need to have libbam.a which means we need to a source install of
SAMtools.
cd ~/BA2009/
mkdir SAMtools
cd SAMtools
wget http://downloads.sourceforge.net/project/samtools/samtools/0.1.6/samtools-0.1.6.tar.bz2?use_mirror=softlayer
tar xvfj samtools-0.1.6.tar.bz2
cd samtools-0.1.6/
The INSTALL file says:
System Requirements
SAMtools depends on the zlib library <<a href=”http://www.zlib.net” class=”external free” rel=”nofollow”>http://www.zlib.net</a>>. The latest version 1.2.3 is preferred and with the latest version you can compile razip and use it to compress a FASTA file. SAMtools’ faidx is able to index a razip-compressed FASTA file to save diskspace. Older zlib also works with SAMtools, but razip cannot be compiled.
The text-based viewer (tview) requires the GNU ncurses library <<a href=”http://www.gnu.org/software/ncurses/” class=”external free” rel=”nofollow”>http://www.gnu.org/software/ncurses/</a>>, which comes with Mac OS X and most of the modern Linux/Unix distributions. If you do not have this library installed, you can still compile the rest of SAMtools by manually modifying one line in Makefile.
Compilation
Type `make’ to compile samtools. If you have zlib >= 1.2.2.1, you can compile razip with `make razip’.
Installation
Simply copy `samtools’ and other executables/scripts in `misc’ to a location you want (e.g. a directory in your $PATH). No further configurations are required.
So
make
...
gcc -c -g -Wall -O2  -D_FILE_OFFSET_BITS=64 -D_USE_KNETFILE -D_CURSES_LIB=1  bam_tview.c -o bam_tview.o
bam_tview.c:5:20: error: curses.h: No such file or directory
bam_tview.c:7:2: warning: #warning "_CURSES_LIB=1 but NCURSES_VERSION not defined; tview is NOT compiled"
bam_tview.c:409:2: warning: #warning "No curses library is available; tview is disabled."
make[1]: *** [bam_tview.o] Error 1
make[1]: Leaving directory `/home/gmod/BA2009/SAMtools/samtools-0.1.6'
make: *** [all-recur] Error 1
So, get ncurses. libncurses5 is already installed.
sudo apt-get libncurses5-dev
make clean
make
Make got a few warnings, but no errors. So, it appears to have made. bam.h and libbam.a are both in the home/gmod/BA2009/SAMtools/samtools-0.1.6 directory.
Bio::DB::Sam Adaptor
cd ~/BA2009/
mkdir GBrowse-Adaptors
cd GBrowse-Adaptors/
svn co https://gmod.svn.sourceforge.net/svnroot/gmod/gbrowse-adaptors/
cd gbrowse-adaptors/trunk/Bio-SamTools/
From the README file:
Then set the environment variable SAMTOOLS to point to this directory and run:
 perl Build.PL
 ./Build
 ./Build test
 (sudo) ./Build install
Where is SAMTOOLS?
$ export SAMTOOLS=/home/gmod/BA2009/SAMtools/samtools-0.1.6
$ perl ./Build.PL
Found /home/gmod/BA2009/SAMtools/samtools-0.1.6/bam.h and /home/gmod/BA2009/SAMtools/samtools-0.1.6/libbam.a.
Checking whether your kit is complete...
Looks good

Checking prerequisites...
Looks good

Creating new 'Build' script for 'Bio-SamTools' version '1.06'
$ ./Build
Copying lib/Bio/DB/Bam/Pileup.pm -> blib/lib/Bio/DB/Bam/Pileup.pm
Copying lib/Bio/DB/Bam/AlignWrapper.pm -> blib/lib/Bio/DB/Bam/AlignWrapper.pm
Copying lib/Bio/DB/Sam.pm -> blib/lib/Bio/DB/Sam.pm
Copying lib/Bio/DB/Sam/Segment.pm -> blib/lib/Bio/DB/Sam/Segment.pm
Copying lib/Bio/DB/Sam/Constants.pm -> blib/lib/Bio/DB/Sam/Constants.pm
Copying lib/Bio/DB/Bam/PileupWrapper.pm -> blib/lib/Bio/DB/Bam/PileupWrapper.pm
Copying lib/Bio/DB/Bam/Alignment.pm -> blib/lib/Bio/DB/Bam/Alignment.pm
Copying lib/Bio/DB/Bam/Target.pm -> blib/lib/Bio/DB/Bam/Target.pm
Copying lib/Bio/DB/Bam/ReadIterator.pm -> blib/lib/Bio/DB/Bam/ReadIterator.pm
Copying lib/Bio/DB/Bam/FetchIterator.pm -> blib/lib/Bio/DB/Bam/FetchIterator.pm
Copying lib/Bio/DB/Bam/Query.pm -> blib/lib/Bio/DB/Bam/Query.pm
lib/Bio/DB/Sam.xs -> lib/Bio/DB/Sam.c
cc -I/home/gmod/BA2009/SAMtools/samtools-0.1.6 -I/usr/lib/perl/5.8/CORE -DXS_VERSION="1.06" -DVERSION="1.06" -fPIC -D_IOLIB=2 -D_FILE_OFFSET_BITS=64 -Wformat=0 -c -D_REENTRANT -D_GNU_SOURCE -DTHREADS_HAVE_PIDS -DDEBIAN -fno-strict-aliasing -pipe -I/usr/local/include -D_LARGEFILE_SOURCE -D_FILE_OFFSET_BITS=64 -O2 -o lib/Bio/DB/Sam.o lib/Bio/DB/Sam.c
ExtUtils::Mkbootstrap::Mkbootstrap('blib/arch/auto/Bio/DB/Sam/Sam.bs')
cc -shared -L/usr/local/lib -o blib/arch/auto/Bio/DB/Sam/Sam.so lib/Bio/DB/Sam.o -L/home/gmod/BA2009/SAMtools/samtools-0.1.6 -lbam -lz
Manifying blib/lib/Bio/DB/Sam/Constants.pm -> blib/libdoc/Bio::DB::Sam::Constants.3pm
Manifying blib/lib/Bio/DB/Bam/AlignWrapper.pm -> blib/libdoc/Bio::DB::Bam::AlignWrapper.3pm
Manifying blib/lib/Bio/DB/Bam/Alignment.pm -> blib/libdoc/Bio::DB::Bam::Alignment.3pm
Manifying blib/lib/Bio/DB/Sam.pm -> blib/libdoc/Bio::DB::Sam.3pm
Manifying blib/lib/Bio/DB/Bam/PileupWrapper.pm -> blib/libdoc/Bio::DB::Bam::PileupWrapper.3pm
Manifying blib/lib/Bio/DB/Bam/Pileup.pm -> blib/libdoc/Bio::DB::Bam::Pileup.3pm
Manifying blib/lib/Bio/DB/Bam/Query.pm -> blib/libdoc/Bio::DB::Bam::Query.3pm
$ ./Build test
t/01sam.t .. 1/93 [fai_load] build FASTA index.
t/01sam.t .. ok
All tests successful.
Files=1, Tests=93,  2 wallclock secs ( 0.01 usr  0.01 sys +  0.81 cusr  0.87 csys =  1.70 CPU)
Result: PASS
$ sudo ./build install
nstalling /usr/local/lib/perl/5.8.8/auto/Bio/DB/Sam/Sam.bs
Installing /usr/local/lib/perl/5.8.8/auto/Bio/DB/Sam/Sam.so
Files found in blib/arch: installing files in blib/lib into architecture dependent library tree
Installing /usr/local/lib/perl/5.8.8/Bio/DB/Sam.pm
Installing /usr/local/lib/perl/5.8.8/Bio/DB/Bam/FetchIterator.pm
Installing /usr/local/lib/perl/5.8.8/Bio/DB/Bam/Pileup.pm
Installing /usr/local/lib/perl/5.8.8/Bio/DB/Bam/Target.pm
Installing /usr/local/lib/perl/5.8.8/Bio/DB/Bam/Query.pm
Installing /usr/local/lib/perl/5.8.8/Bio/DB/Bam/Alignment.pm
Installing /usr/local/lib/perl/5.8.8/Bio/DB/Bam/AlignWrapper.pm
Installing /usr/local/lib/perl/5.8.8/Bio/DB/Bam/ReadIterator.pm
Installing /usr/local/lib/perl/5.8.8/Bio/DB/Bam/PileupWrapper.pm
Installing /usr/local/lib/perl/5.8.8/Bio/DB/Sam/Constants.pm
Installing /usr/local/lib/perl/5.8.8/Bio/DB/Sam/Segment.pm
Installing /usr/local/man/man3/Bio::DB::Bam::PileupWrapper.3pm
Installing /usr/local/man/man3/Bio::DB::Bam::Pileup.3pm
Installing /usr/local/man/man3/Bio::DB::Sam::Constants.3pm
Installing /usr/local/man/man3/Bio::DB::Bam::Query.3pm
Installing /usr/local/man/man3/Bio::DB::Sam.3pm
Installing /usr/local/man/man3/Bio::DB::Bam::Alignment.3pm
Installing /usr/local/man/man3/Bio::DB::Bam::AlignWrapper.3pm
Writing /usr/local/lib/perl/5.8.8/auto/Bio/SamTools/.packlist
And the adaptor is now in.
All prerequisite software for this tutorial is now installed. The starting VMware image for this tutorial was taken at this point.
On some system on error occurs like this
$ ./Build
cc -shared -O2 -g -L/usr/local/lib -o blib/arch/auto/Bio/DB/Sam/Sam.so lib/Bio/DB/Sam.o -L/home/pgeller/BA2009/SAMtools/samtools-0.1.6/ -lbam -lz
/usr/bin/ld: /home/pgeller/BA2009/SAMtools/samtools-0.1.6//libbam.a(bgzf.o): relocation R_X86_64_32S against `.rodata.str1.1' can not be used when making a shared object; recompile with -fPIC
/home/pgeller/BA2009/SAMtools/samtools-0.1.6//libbam.a: could not read symbols: Bad value
collect2: ld returned 1 exit status
error building blib/arch/auto/Bio/DB/Sam/Sam.so from lib/Bio/DB/Sam.o at /usr/share/perl/5.10/ExtUtils/CBuilder/Base.pm line 213.
If this is the case go back to SAM tools folder and recompile with the -fPIC parameter
make clean
make CXXFLAGS=-fPIC CFLAGS=-fPIC CPPFLAGS=-fPIC
Start
Everything above this point describes how the starting image was created. You can now start the tutorial.
If you haven’t done so already, download the starting image for this image, unpack it, and start it.
Adding Human Data
SAMtools comes with some example data covering small parts of human chromosomes 2 and 20. This section describes how to add a GBrowse instance for viewing human chromosomes 2 and 20, in addition to the default GBrowse instances.
We are going to use that data to demonstrate how GBrowse visualizes short read data using SAMtools.
Getting Human Data
Note: The FASTA and GFF3 files described here have already been downloaded into the starting VMware image.
It would be nice to show context, such as the reference sequence and predicted genes, with our short reads. To do this we will need to get GFF3 with gene models, and FASTA for the sequence. We can do that.
FASTA
At UCSC, build 36.1 is available by chromosome:
- http://hgdownload.cse.ucsc.edu/goldenPath/hg18/chromosomes/
- http://hgdownload.cse.ucsc.edu/goldenPath/hg18/chromosomes/chr2.fa.gz
- http://hgdownload.cse.ucsc.edu/goldenPath/hg18/chromosomes/chr20.fa.gz
According to http://hgdownload.cse.ucsc.edu/goldenPath/hg19/chromosomes/:
The chr*_random sequences are unplaced sequence on those reference chromosomes.
So, we will ignore those.
cd ~/BA2009
mkdir HumanData
cd HumanData
wget http://hgdownload.cse.ucsc.edu/goldenPath/hg18/chromosomes/chr20.fa.gz
wget http://hgdownload.cse.ucsc.edu/goldenPath/hg18/chromosomes/chr2.fa.gz
gunzip chr20.fa.gz
gunzip chr2.fa.gz
Take a look at the first line of each file
head -1 chr2.fa chr20.fa
This should say the names of the sequences are “chr2” and “chr20”. This matters because the chromosome names occur in several places and serve to tie everything together.
GFF3
GFF3 is a widely used standard format for genomic annotation.
When you are looking for GFF3 for an organism is a good place to start is GBrowse.org, which lists GBrowse related resources for many organisms.
However, I know that the CBRG at the University of Oxford does a lot with GBrowse and human data, so I asked Simon McGowan if he could make the GFF3 for human chromosomes 2 and 3 available, and he did:
wget http://www.compbio.ox.ac.uk/data/HUMAN_HG18/ensembl/chr2_ens_annots.gff
wget http://www.compbio.ox.ac.uk/data/HUMAN_HG18/ensembl/chr20_ens_annots.gff
- Everything up to here has already been done in the starting VMware image.
- Now we start doing things.
Past experience has taught that whenever you get a GFF3 file from elsewhere it is a darn fine idea to check that the reference sequence that all features are positioned on is defined at the top of the file.
head -5 chr2_ens_annots.gff chr20_ens_annots.gff
Nope.
To add reference sequence you need to know how long it is. Since I got the files from CBRG, I went to their GBrowse instance (https://gbrowse.molbiol.ox.ac.uk/cgi-bin/gbrowse/HUMAN_HG18/) and typed in “chr2” and then “chr20” in the search box, and let GBrowse tell me how big they were:
Showing 242.8 Mbp from chr2, positions 1 to 242,751,149
Showing 62.44 Mbp from chr20, positions 1 to 62,435,964
I could have also done some quick calculation using the size of the FASTA files.
Edit chr2_ens_annots.gff and add this line, separate each item by
tabs:
chr2 Ensembl chromosome 1 242751149 . . . Name=chr2
Edit chr20_ens_annots.gff and add this line, separate each item by
tabs:
chr20 Ensembl chromosome 1 62435964 . . . Name=chr20
Gene Definitions in these GFF3 Files
An example gene definition from the GFF3
chr20 Ensembl mRNA 56701315 56724307 . + . ID=NPEPL1;Name=NPEPL1;description=Probable aminopeptidase NPEPL1 (EC 3.4.11.-) (Aminopeptidase-like 1).;ensgene_id=ENSG00000215440
chr20 Ensembl exon 56701315 56701513 . + . ID=ENSE00001542441;Parent=NPEPL1
chr20 Ensembl exon 56702200 56702385 . + . ID=ENSE00001542440;Parent=NPEPL1
...
Columns
- 1: Reference sequence
- 2: Source: A comment that identifies where this feature came from or what it means
- 3: Type: Sequence Ontology term describing this feature
- 4, 5: Start position and end positions, 1 relative
- 6, 7, 8: Score, Strand, Phase
- 9: Attributes
- ID: Uniquely identifies feature
- Name: used for searches and display
- Parent: Who this feature belongs to in a multi-part feature.
Genes are defined as mRNAs containing one or more exons, in this file.
Displaying Human Data in GBrowse
Now that we have our reference sequence and the Ensembl gene models for chromosomes 2 and 20, lets show them.
Create human.conf
First we need to create a new configuration file for our human data. GBrowse configuration files on Debian based systems go in
/etc/gbrowse2/
To do this, I copied yeast_chr1+2.conf and edited it. Here are the
initial contents of the file:
[GENERAL]
description   = Human Chromosomes 2 and 20
database      = annotations

initial landmark = chr20:67960..69550

default tracks = PredictedGenes

# examples to show in the introduction
examples = chr20:67960..69559 chr2:2043960..2045540

# bring in the special Submitter plugin
plugins   = FastaDumper RestrictionAnnotator SequenceDumper TrackDumper Submitter

# "automatic" classes to try when an unqualified identifier is given
# automatic classes = Symbol Gene Clone

#################################
# database definitions
#################################

[annotations:database]
db_adaptor     = Bio::DB::SeqFeature::Store
db_args        = -adaptor DBI::mysql
             -dsn human
search options = default +autocomplete

# Advanced feature: custom balloons
custom balloons = [balloon]
                  delayTime = 500

                  [balloon500]
              maxWidth  = 500
                  delayTime = 50


# Advanced feature: an example of callbacks to be run remotely
# by gbrowse_details for AJAX/iframe balloons
[TOOLTIPS]
intro = sub {
                my $args  = shift;
                my $feat  = $args->{feature};
                my $name  = $feat->display_name;
                my $type  = $feat->primary_tag;
                my $class = $feat->class;
                my $extra = join(' ',$feat->each_tag_value('Note')) if $feat->has_tag('Note');
                my $n     = $type =~ /^[AEIOU]/i ? 'n' : '';
                my $msg   = "Hello, I am $name, a$n $type of class $class";
                $msg     .= "<br>I am described as a <i><b>$extra</b></i>" if $extra;
                $msg     .= "<br>Click to see the sequence of $name";
                return "<table><tr><th bgcolor='lightsteelblue'>$name</th><tr>" .
                       "<tr><td>$msg</td></tr></table>";
           }
full_sequence = sub {
              my $args = shift;
          my $feat = $args->{feature};
          my $name  = $feat->display_name;
          my $seq = $feat->seq->seq;
          $seq =~ s/(\S{75})/$1\n/g;
          return "<pre style='font-size:8pt'>>$name\n$seq</pre>";
               }

# Advanced feature:
# Pop up rubberband menus for submitting selected region to search engines...
#include "detail_select_menu.conf"
#include "submitter_plugin.conf"

# Default glyph settings
[TRACK DEFAULTS]
glyph       = generic
database    = annotations
height      = 8
bgcolor     = cyan
fgcolor     = black
label density = 25
bump density  = 100
# default pop-up balloon
balloon hover = <b>$name</b> is a $type spanning $ref from $start to $end. Click for more details.

### TRACK CONFIGURATION ####
# the remainder of the sections configure individual tracks

[DNA]
glyph          = dna
global feature = 1
height         = 40
do_gc          = 1
category       = Basic features
gc_window      = auto
strand         = both
fgcolor        = red
axis_color     = blue
discoverable   = 0
key            = DNA

[Translation]
glyph          = translation
global feature = 1
height         = 40
category       = Basic features
fgcolor        = purple
strand         = +1
translation    = 6frame
key            = 6-frame translation

[PredictedGenes]
feature        = mRNA
glyph          = so_transcript
description    = 1
bgcolor        = beige
category       = Basic features
key            = Ensembl predicted genes
What it Means
Lets go over some of the more important sections.
[GENERAL]
description   = Human Chromosomes 2 and 20
database      = annotations

initial landmark = chr20:67960..69550

default tracks = PredictedGenes

# examples to show in the introduction
examples = chr20:67960..69559 chr2:2043960..2045540
- The title of the GBrowse instance in users’ browsers.
- The default DB will be “annotations” - more on that in a bit
- What region and tracks GBrowse will show when it first comes up.
-
What example regions will be displayed as hot links.
[annotations:database] db_adaptor = Bio::DB::SeqFeature::Store db_args = -adaptor DBI::mysql -dsn human search options = default +autocomplete
- Which adaptor we are going to use
- GBrowse has lots of adaptors; we’ll use 2 in this example
-
Which DBMS (MySQL) and database (“human”) to get data from.
# Default glyph settings [TRACK DEFAULTS] glyph = generic database = annotations height = 8 bgcolor = cyan fgcolor = black label density = 25 bump density = 100 # default pop-up balloon balloon hover = $name is a $type spanning $ref from $start to $end. Click for more details.
- Track default values. These can be overridden in each track.
- Glyph determine how data is shown
-
as a box, linked boxes, xyplot, …
[DNA] glyph = dna global feature = 1 height = 40 do_gc = 1 category = Basic features gc_window = auto strand = both fgcolor = red axis_color = blue discoverable = 0 key = DNA
[Translation] glyph = translation global feature = 1 height = 40 category = Basic features fgcolor = purple strand = +1 translation = 6frame key = 6-frame translation
-
- Tracks will show the DNA and codon translation.
- Both the “dna” and “translation” glyphs are smart.
-
They use semantic zooming to display information in different ways at high zoom and low zoom.
[PredictedGenes] feature = mRNA glyph = so_transcript description = 1 bgcolor = beige category = Basic features key = Ensembl predicted genes
-
- Show the predicted Ensembl genes.
- The “so_transcript” is also smart and knows how to display multi-part features.
- Genes are defined in the GFF as mRNAs containing one or more exons.
- This track definition is more typical then the DNA and Translation tracks.
- Of particular importance is:
feature = mRNA
Tells GBrowse what subset of features from the GFF files to display in this track.
GBrowse scans column 3 (the Sequence Ontology term) and only displays items with this feature type.
Our example gene definition from the GFF3
chr20 Ensembl mRNA 56701315 56724307 . + . ID=NPEPL1;Name=NPEPL1; ...
chr20 Ensembl exon 56701315 56701513 . + . ID=ENSE00001542441;Parent=NPEPL1
chr20 Ensembl exon 56702200 56702385 . + . ID=ENSE00001542440;Parent=NPEPL1
...
The file also contains information on popups and hovering. This is leftover from the original yeast file. I’m not going to talk about it, but we’ll leave it there because it is nice to have.
Create the Human Database
In the human.conf file, we told GBrowse that the data would come from
a MySQL database called “human”:
[annotations:database]
db_adaptor     = Bio::DB::SeqFeature::Store
db_args        = -adaptor DBI::mysql
             -dsn human
We now have to create it:
mysql -uroot
create database human;
grant all privileges on human.* to gmod@localhost;
grant select on human.* to 'www-data'@'localhost';
quit
“www-data” is the Apache user on Ubuntu. When GBrowse runs, by default it will run as the same user as Apache.
Load the Gene Models and Sequence
The database now exists, but it’s empty.
GBrowse has many adaptors that it can use to get data with. We aren’t going to use it, but one of the simplest is the memory adaptor. This adaptor just reads files from a directory into memory and uses them there.
The default location for these directories on Ubuntu is
/var/www/gbrowse2/databases/
If you look at that directory you’ll notice that the default installation has already created several directories there.
Since we are going to store the data in a database, it doesn’t really matter where we put the files. However, to make it easier to keep track of what data was loaded, I like to create a new directory in the default location, and place data files there before loading them. It helps me remember a week later what was uploaded.
sudo mkdir /var/www/gbrowse2/databases/human_annotations
sudo chown www-data:www-data /var/www/gbrowse2/databases/human_annotations
sudo chmod 755 /var/www/gbrowse2/databases/human_annotations
cd /var/www/gbrowse2/databases/human_annotations
sudo cp /home/gmod/BA2009/HumanData/chr2_ens_annots.gff .
sudo cp /home/gmod/BA2009/HumanData/chr2.fa .
sudo cp /home/gmod/BA2009/HumanData/chr20_ens_annots.gff .
sudo cp /home/gmod/BA2009/HumanData/chr20.fa .
We told GBrowse to use the Bio::DB::SeqFeature::Store Perl module to retrieve the data. That means will load the data with a BioPerl script that uses that module to load it.
bp_seqfeature_load.pl -c -f -d human chr2_ens_annots.gff chr2.fa 2>&1 | tee /tmp/bpsl.log1
bp_seqfeature_load.pl -f -d human chr20_ens_annots.gff chr20.fa 2>&1 | tee /tmp/bpsl.log2
Tell GBrowse About the new Human Data
GBrowse data sources (that is, different instances of GBrowse on your server) are defined in
/etc/gbrowse2/GBrowse.conf
And it is currently write protected:
sudo chmod 644 /etc/gbrowse2/GBrowse.conf
Edit that file and add this stanza at the end:
[human]
description  = Human Chromosomes 2 and 20
path         = human.conf
Test It
You can either do this from Firefox inside your VMware image, or you can do it from a browser in your host operating system.
From inside VMware, in Firefox type:
http://localhost/gb2/gbrowse/human/
To use a browser on your host system first type this command inside the VMware system:
ifconfig
...
          inet addr:<b>172.16.108.129</b>  Bcast:172.16.108.255  Mask:255.255.255.0
...
Then type the inet addr into your browser. In this case:
http://172.16.108.129/gb2/gbrowse/human
You should see something like this:
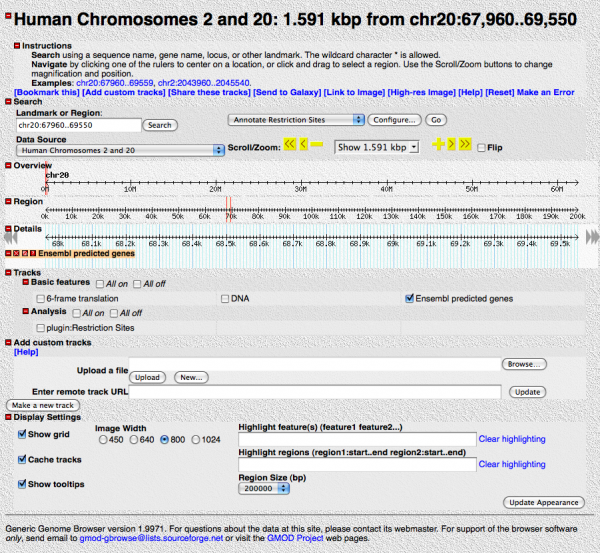
Play around with it a little. Enable different tracks, scroll and zoom in and out.
Add Short Read Data
We now have a GBrowse instance that shows human chromosomes 2 and 20. If we had other annotation we wanted to show, we could add it incrementally from here.
And we do! Lets show the example data that comes with SAMtools. This can be found in
/home/gmod/BA2009/SAMtools/samtools-0.1.6/examples/
The 00README.txt says:
File ex1.fa contains two sequences cut from the human genome build36.
They were extracted with command:
samtools faidx human_b36.fa 2:2043966-2045540 20:67967-69550
Sequence names were changed manually for simplicity. File ex1.sam.gz
contains MAQ alignments extracted with:
 (samtools view NA18507_maq.bam 2:2044001-2045500;
  samtools view NA18507_maq.bam 20:68001-69500)
and processed with samtools fixmate to make it self-consistent as a
standalone alignment.
To try samtools, you may run the following commands:
 samtools faidx ex1.fa                 # index the reference FASTA
 samtools import ex1.fa.fai ex1.sam.gz ex1.bam   # SAM->BAM
 samtools index ex1.bam                # index BAM
 samtools tview ex1.bam ex1.fa         # view alignment
 samtools pileup -cf ex1.fa ex1.bam    # pileup and consensus
 samtools pileup -cf ex1.fa -t ex1.fa.fai ex1.sam.gz
Well, crap!
If you read that carefully, it looks like the short read data has been munged to make our lives easier so we don’t have to go find a complete FASTA and genome annotations to see the data.
Lets take a look at the SAM file.
cd /home/gmod/BA2009/SAMtools/samtools-0.1.6/examples/
gunzip ex1.sam.gz
head -2 ex1.sam
B7_591:4:96:693:509 73  seq1    1   99  36M *   0   0   CACTAGTGGCTCATTGTAAATGTGTGGTTTAACTCG    <<<<<<<<<<<<<<<;<<<<<<<<<5<<<<<;:<;7  MF:i:18 Aq:i:73 NM:i:0  UQ:i:0  H0:i:1  H1:i:0
EAS54_65:7:152:368:113  73  seq1    3   99  35M *   0   0   CTAGTGGCTCATTGTAAATGTGTGGTTTAACTCGT <<<<<<<<<<0<<<<655<<7<<<:9<<3/:<6):   MF:i:18 Aq:i:66 NM:i:0  UQ:i:0  H0:i:1  H1:i:0
Sure enough the RNAME column (col 3) is “seq1” when we want it to be “chr2” and the POS and MPOS columns (cols 4 & 8) are 1 and 0, when we want them to be 2043966 and 2043965 (or something like that).
Unmunge the data
So, we write a quick and dirty script to fix the file:
cd ~/BA2009/HumanData/
Create a file called relocate.py and populate it with this code:
#!/usr/bin/env /usr/bin/python
# -*- coding: iso-8859-1 -*-
#-------------------------------------------------------------------
"""
SAMtools comes with example data from human chromosomes 2 and 20, but it
has been relocated from its place in those chroms to start at position 1.

This script moves it back.
"""
import sys

CHR2_OFFSET = 2043965
CHR20_OFFSET = 67966

# ------------------------------------------------------------------
# MAIN
# ------------------------------------------------------------------

config = {
    "SAM_INPUT_FILE":    "/home/gmod/BA2009/SAMtools/samtools-0.1.6/examples/ex1.sam",
    "SAM_OUTPUT_FILE":   "ex1.sam"
}

# File has 12 or 17 tab separate columns.  Update 3 of them.

samIn  = open(config["SAM_INPUT_FILE"], "r")
samOut = open(config["SAM_OUTPUT_FILE"], "w")

line = samIn.readline()
while (line):
    # split it by tabs
    cols = line.split("\t")
    if len(cols) != 17 and len(cols) != 12:  # sanity check
        print "Warning: Line has " + str(len(cols)) + " columns\n" + line + "\n"

    # Fix sequence name
    if cols[2] == "seq1":
        cols[2] = "chr2"
    elif cols[2] == "seq2":
        cols[2] = "chr20"
    else:
        print "unknown seq: " + cols[2] + "\n"
        sys.exit(0)

    # Fix Pos & mate pos
    if cols[2] == "chr2":
        cols[3] = str(int(cols[3]) + CHR2_OFFSET)
        cols[7] = str(int(cols[7]) + CHR2_OFFSET)
    else:
        cols[3] = str(int(cols[3]) + CHR20_OFFSET)
        cols[7] = str(int(cols[7]) + CHR20_OFFSET)

    # all happy now.
    outLine = "\t".join(cols)
    samOut.write(outLine)
    line = samIn.readline()

sys.exit(0)
And run it:
chmod 755 relocate.py
./relocate.py
Convert Munged SAM to a BAM
- SAM is a human readable text format.
- GBrowse expects to find SAM data in BAM format, a binary, indexed and highly compressed format.
Now we invoke some SAMtools magic.
First create a single FASTA file from the two:
cat chr2.fa chr20.fa > chr2_20.fa
Note: There may be a way to use two separate FASTA files, but I don’t know how.
Second, create a FASTA index file on the combined file:
export SAMTOOLS=/home/gmod/BA2009/SAMtools/samtools-0.1.6
$SAMTOOLS/samtools faidx chr2_20.fa
Which produces the chr2_20.fa.fai file. Now lets try to convert the
SAM to BAM:
$SAMTOOLS/samtools import chr2_20.fa.fai ex1.sam ex1.bam
[sam_header_read2] 2 sequences loaded.
Copy the BAM files to where GBrowse can see them
The GBrowse SAMtools adaptor does expect to find the files in a particular directory. Create one in the usual place:
sudo mkdir /var/www/gbrowse2/databases/humansam
sudo chown www-data:www-data /var/www/gbrowse2/databases/humansam
sudo chmod 755 /var/www/gbrowse2/databases/humansam
sudo cp chr2_20.fa /var/www/gbrowse2/databases/humansam/
sudo cp ex1.bam /var/www/gbrowse2/databases/humansam/
Tell GBrowse About the SAM Files
To do this update the config file for human at:
/etc/gbrowse2/human.conf
There are several changes to make. First add the new database section right below the existing one:
[humansam:database]
db_adaptor     = Bio::DB::Sam
db_args        = -fasta /var/www/gbrowse2/databases/humansam/chr2_20.fa
                 -bam   /var/www/gbrowse2/databases/humansam/ex1.bam
search options = default
This tells GBrowse that there is a second database to get things from, where to find it, and to use the Bio::DB::Sam adaptor to read it in.
Displaying Summary Data
Next, add in a track to show read coverage as an XY plot. At the bottom of the file add:
[CoverageXyplot]
feature        = coverage
glyph          = wiggle_xyplot
database       = humansam
height         = 50
fgcolor        = black
bicolor_pivot  = 20
pos_color      = blue
neg_color      = red
key            = Coverage (xyplot)
category       = Reads
label          = 0 # Labels on wiggle tracks are redundant.
Save your changes, and hit the “[Reset]” link on your GBrowse window. This should return you to where you first started except that there is now a “Coverage (xyplot)” track you can turn on. Turn it on.
Also, turn off “Cache Tracks”. You want that off whenever you are experimenting with the configuration file.
You should see something like:
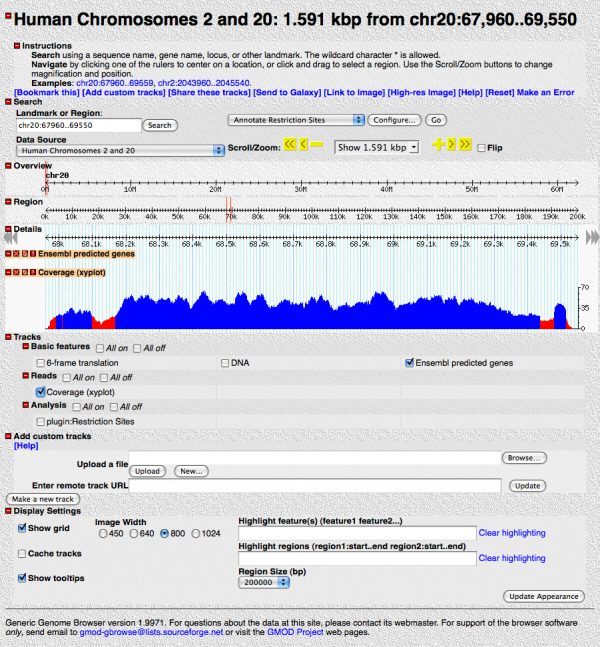
This shows the read coverage. We told GBrowse to flag any read depth below 20 as red.
You can also show read coverage with color intensity. Add this stanza at the end of the config file:
[CoverageDensity]
feature       = coverage
glyph         = wiggle_density
database      = humansam
height        = 30
bgcolor       = blue
bicolor_pivot = 20
pos_color     = blue
neg_color     = red
key           = Coverage (density plot)
category      = Reads
label         = 0 # labels on wiggle tracks are redundant
Save your changes, and hit the “[Reset]” link again. You will now have a “Coverage (density plot)” track you can turn on. Turn it on.
Showing Individual Reads
You can also show the individual reads. Add this clause at the end of
/etc/gbrowse2/human.conf:
[Reads]
feature        = match
glyph          = segments
draw_target    = 1
show_mismatch  = 1
mismatch_color = red
database       = humansam
bgcolor        = blue
fgcolor        = white
height         = 5
label density  = 50
bump           = fast
key            = Reads
category       = Reads
Save your changes, hit the “[Reset]” link, and turn on the “Reads” track. It should look like:
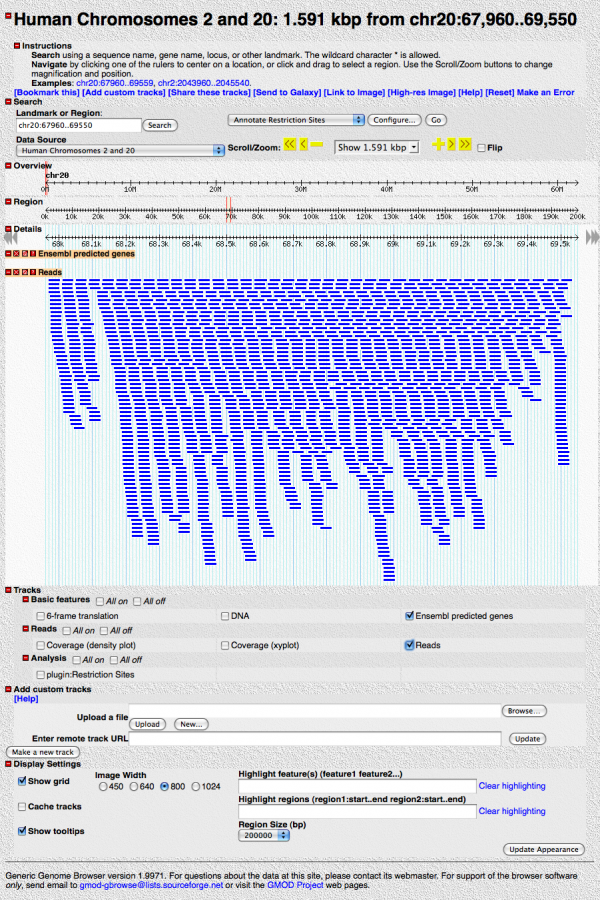
Zoom in. When you get close to about 100bp resolution, you’ll see the individual base pairs, and mismatches will be highlighted in red.
Showing Mapping Quality
A lot of people want to show individual base read quality. We can’t do that yet, but we do have programmatic access to the individual reads and can use that to display some things, such as mapping quality.
We do this with a Perl callback, a short (usually) snippet of code that sets a parameter based on values in the feature. The popup and hover settings in the file already use this. Here, we’ll do something simple: setting the color intensity based on mapping quality.
In the config file, /etc/gbrowse2/human.conf, in the [Reads] stanza,
replace this lines:
bgcolor        = blue
fgcolor        = white
with
bgcolor = sub {
        my $feature = shift;
        my $blueness = 255 - int($feature->qual * 2.40);
        my $colour = chr(35) . sprintf("%X", $blueness) .
                               sprintf("%X", $blueness) . "FF";
        return $colour;
        }
fgcolor      = black
High quality mappings will be dark blue, lower quality ones will be light blue.
Give it a go.
Showing Paired End Reads
Finally, the example data is for paired end reads. To visualize the pairings add this stanza at the end of the config file:
[Pair]
feature       = read_pair
glyph         = segments
database      = humansam
draw_target   = 1
show_mismatch = 1
bgcolor       = sub {
                my $f = shift;
        return $f->attributes('M_UNMAPPED') ? 'red' : 'green';
                }
fgcolor       = green
height        = 3
label         = sub {shift->display_name}
label density = 50
bump          = fast
connector     = dashed
balloon hover = sub {
                my $f     = shift;
                return '' unless $f->type eq 'match';
                return 'Read: '.$f->display_name.' : '.$f->flag_str;
                }
key           = Read Pairs
category      = Reads
Reset GBrowse and test this.
Facts about “GBrowse NGS Tutorial”
| Has topic | GBrowse + |