GMOD
VMware 2011 Spring Training
In this session, we’ll get the VMware image up and running on your laptop.
Contents
- 1 Download Course Images
- 2 System Requirements
- 3 System Configuration
- 4 Getting the VMware Image
- 5 Unpacking the Image
- 6 Opening the Image
- 7 Did you move or copy the image?
- 8 Logging In and other useful things
- 9 Resizing the Display
- 10 Linux Text Editors
Download Course Images
We took snapshots of the VMware image immediately before the 2010 course, and at the end of each day. These images have now been copied to the GMOD FTP site and are available for download.
).
System Configuration
Details on on how the system is configured.
| Value | |
|---|---|
| Image Name | GMODCourse2010 |
| OS | Ubuntu 9.10 server 32 bit Patches current as of Feb 2011 |
| RAM (virtual) | 2GB |
| Disk (virtual) | 40GB, allocated as needed, 2 GB at a time |
| Networking | NAT |
| Root username | gmod |
| Root password | gmodamericas2011 |
Additional Installed Software
Ubuntu server comes with a lot preinstalled. Nevertheless, we wanted more. This lists most additional software that we installed, and how and why.
| Software | Mechanism | Why |
|---|---|---|
| xinit | sudo apt-get install xinit |
GUI foundation (X11) |
| Gnome | sudo apt-get install ubuntu-desktop |
GUI Desktop |
| Subversion | sudo apt-get install subversion |
Source code control |
| libgd2 dev | sudo apt-get install libgd2-xpm-dev |
Graphics. Chose not to use libgd2-noxopm-dev (what we used last year) because it would have uninstalled ubuntu-desktop and not replaced it with anything. |
| autoconf | sudo apt-get install autoconf |
Package building |
| Apache | sudo apt-get install apache2 |
Web server |
| Java 6 | sudo apt-get install sun-java6-jdk |
Java run time and tools; need for Apollo. |
| CVS | sudo apt-get install cvs |
Source code control. |
| CGI:;Session perl module | sudo apt-get install libcgi-session-perl |
Persistent session data in CGI apps |
| DBD::Pg perl module | sudo apt-get install libdbd-pg-perl |
Perl DBI driver for PostgreSQL. |
| Digest::MD5::File perl module | sudo apt-get install libdigest-md5-file-perl |
MD5 checksums |
| Class::Base perl module | sudo apt-get install libclass-base-perl |
Perl module class plumbing. |
| Module::Build | sudo apt-get install libmodule-build-perl |
Subclassable and make-independent perl module builder alternative |
| Inkscape | sudo apt-get install inkscape |
High-res image generation in GBrowse. |
| DBD::MySQL | sudo apt-get install libdbd-mysql-perl |
Access to MySQL DBs in Perl. |
| MySQL Server | sudo apt-get install mysql-server |
MySQL database; used as a backend to GBrowse. Root password is same as for the system. |
| IO::String perl module | sudo apt-get install libio-string-perl |
Emulate IO::File interface for in-core strings |
| Statistics::Descriptive perl module | sudo apt-get install libstatistics-descriptive-perl |
Perl module for basic descriptive statistical functions. |
| GD2 in perl | sudo apt-get install libgd-gd2-perl |
Perl module wrapper for libgd - gd2 variant |
| Ant | sudo apt-get install ant |
Make, but aimed specifically at Java compilation |
| Emacs | sudo apt-get install emacs |
The emacs text editor. |
| C++ Compiler | sudo apt-get install g++ |
C++ compiler from GNU. Required for MAKER |
| Perldoc Reader | sudo apt-get install perl-doc |
Allows you to read perldoc documentation. |
| libgd-tools | sudo apt-get install libgd-tools |
GD command line tools |
| PostgreSQL | sudo apt-get install postgresql |
Postgres database management system. Used by Chado |
| GD::SVG Perl module | sudo apt-get install libgd-svg-perl |
"Seamlessly enable SVG output from scripts written using GD." - such as GBrowse. |
| Bio::Graphics::Browser2 | sudo cpan;
cpan> install Bio::Graphics::Browser2 |
This installs GBrowse2 as well as all prereqs, like GD, BioPerl and Bio::Graphics |
| Bio::DB::Das::Chado | sudo cpan;
cpan> install Bio::DB::Das::Chado |
Needed for GBrowse to access a Chado database |
| Template::Toolkit | sudo apt-get install libtemplate-perl |
Needed for Chado installer |
| XML::Simple | sudo apt-get install libxml-simple-perl |
Needed for Chado installer |
| Log::Log4perl | sudo apt-get install liblog-log4perl-perl |
Optionally logs Chado related events |
| Parse::RecDescent | sudo apt-get install libparse-recdescent-perl |
Needed for loading ontologies into Chado |
| Bio%253A%253AChado%253A%253ASchema | sudo cpan;
cpan> install Bio%253A%253AChado%253A%253ASchema |
Needed for DBIx::Class access to Chado; used for publication loader |
| GO::Parser | sudo cpan;
cpan> install GO::Parser |
Needed for ontology loading into Chado |
| DBIx::DBSchema | sudo cpan;
cpan> install DBIx::DBSchema |
Needed for ontology loading into Chado |
| Module::Load | sudo cpan;
cpan> install Module::Load |
Needed for GFF loading into Chado |
| DBIx::DBStag | Installed by hand; cpan usually doesn't work for this | Needed for ontology loading into Chado |
| XML::Parser::PerlSAX | sudo cpan;
cpan> install XML::Parser::PerlSAX |
Needed for ontology loading into Chado |
| ttf-mscorefonts-installer | sudo apt-get install ttf-mscorefonts-installer |
Fonts used by Galaxy |
| python-dev | sudo apt-get install python-dev |
Used in Galaxy session. |
| python-setuptools | sudo apt-get install python-setuptools |
Used in Galaxy session. |
| python-pip | sudo apt-get install python-pip |
Used in Galaxy session. |
| bx-python scripts | sudo pip install bx-python |
Scripts used by Galaxy |
Getting the VMware Image
To avoid swamping the GMOD FTP server (the file is almost 4GB), we will initially distribute the image on several flash drives and DVDs.
The image has already been installed on the loaner laptops.
Unpacking the Image
Once you have the image on your system you will need to uncompress it. This will result in a new file (actually a directory) called
GMODCourse2011.vmwarevm.
Opening the Image
Once you have unpacked the image, open it by double clicking on it. This should automatically launch VMware.
Did you move or copy the image?
You Moved It!
Yes you did.
VMware then asks you if you moved or copied this image. Tell it you moved it. Doing anything else is bad.
Logging In and other useful things
After starting up the VMware image (which will take several seconds),
the system will automatically log you in as user “gmod”. (This behavior
can be changed at System → Administration → Login Screen.) You will
need the password, “gmodamericas2011”, to run sudo.
At this point, you have a few options for how to use it. Either way you will need to open a terminal window. To do this, click on the black rectangle in the top bar. This will open a terminal window and start a shell.
If you would like to ssh in to the server (which I suggest as a good idea: copy and pasting commands will be easier and you will be able to use an environment you are used to), then you will need the server’s ip address. To get it, open a terminal and type:
$ ifconfig
which will give you output like this:
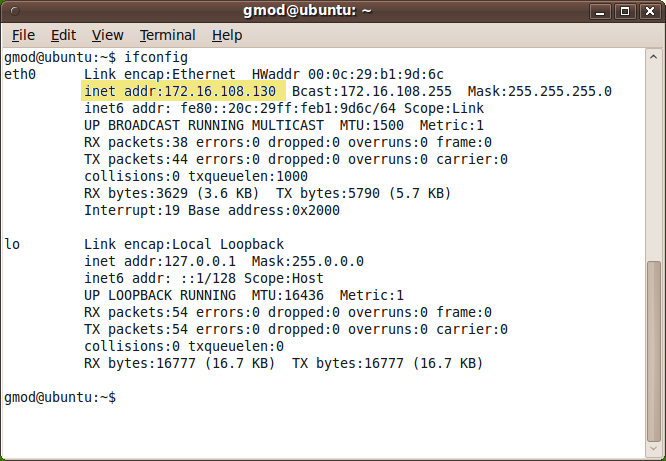
See that inet addr:172.16.108.130? Those four numbers are the IP
address. You can now (from you host operating system) ssh into the
machine by typing
$ ssh gmod@172.16.108.130
You can also go to the web server running on this server by going to http://172.16.108.130 (for example). If you are on Windows and would like to do this, you can get putty, which is a free ssh client for Windows.
You can also use the graphical user interface on the server, using a browser and terminal inside of VMware/Ubuntu.
The text console is initially configured to work with a US keyboard. If you are not using a US keyboard you can type:
$ sudo apt-get install console-data
Select the options for your own machine. Note that this will not affect the X environment or any logins via SSH or PuTTY.
Resizing the Display
You should be able to resize your window just by clicking and dragging.
However, if that doesn’t work, you can try the xrandr command to
resize your display.
$ xrandr
...
   800x600
   640x480
...
This lists all the sizes you can resize your screen to. To resize your screen
$ xrandr -s widthxheight
For example,
$ xrandr -s 1280x960
works well on my 15” MacBook Pro.
Linux Text Editors
You will need to do a lot of file editing in this course. If you are going to do that editing directly in the VMware image, you will need to pick a Linux text editor.
Examples on session pages show the text editor of choice of the
instructor who wrote the page. This is most often vi or emacs
However, if you aren’t already familiar with one of these then you are
better off using gedit. It is less powerful, but is also much more
straightforward to use.
$ gedit filename &