GMOD
InterMine Tutorial 2011
Contents
- 1 OOOPS!
- 2 Introduction
- 3 Overview
- 4 Loading Data
Into Your Database
- 4.1 The tutorial data
- 4.2 The MineManager Graphical Installer
- 4.3 Starting a new Mine
- 4.4 Adding
Sources to a Project
- 4.4.1 Importing Protein Data From Uniprot
- 4.4.2 The GFF3 source
- 4.4.3 FASTA files
- 4.4.4 Entrez Organism
- 4.4.5 Loading Custom Data Sources
- 4.5 Running a Build
- 5 Deployment
- 6 Accessing Your Data Through the Webapp
- 7 Accessing Your Data through the Webservice
OOOPS!
First things first:
- I forgot to install a cpan module:
sudo cpan Expect
- You need to run a command:
cp -r /home/gmod/Documents/Software/intermine/bio/sources/example-sources/malaria-gff /home/gmod/Documents/Software/intermine/bio/sources/
Introduction
InterMine is a project that aims to make creating, running, and maintaining massive data warehouses of integrated genomics data fast and flexible. It provides a back end database solution, a front end web-application, and a fully capable webservice API to access the data you host. InterMine already powers several websites, including FlyMine, modMine, RatMine, YeastMine, and soon metabolicMine and ZFINmine as well.
InterMine is fundamentally data agnostic, and can host any data you like, but we have been funded to develop genomics tools, and you will find a wide range of utilities that make dealing with different biological sources of data easy. Dealing with the massive amount of data that genomics research produces is never really easy, but InterMine makes the straightforward simple, and the difficult possible.
Overview
We aim to demonstrate three strengths of InterMine:
- It’s
effortlessstraightforward to integrate data from different datasets (even your own data!) into one database. - Once you get your data into the database, you get a powerful, works-out-of-the-box webapp that makes it easy and fun to access your data.
- Once you get your webapp up on the server, you get a sophisticated webservice that enables you or others to access the data via scripts, Java programs and other web-pages.
To do this, we will set up a stand-alone InterMine. This consists of a PostgreSQL database and a Java web-app sitting on top of it. Setting up your InterMine involves loading data into this database, and then mounting the web application in a running Tomcat instance.
Loading Data Into Your Database
The database schema, and the Java classes that represent it, are generated from XML configuration files. To manage this each mine has an associated Java project folder, named after itself. This project also contains code which manages integration, or the procedure of loading data into the scheme once it has been defined. Therefore the outline of this section is:
- Setting up the project structure
- Configuring the data sources and the associated schema
- Running the build process
The tutorial data
We will use the sample data set we distribute with our source. This is located at:
~/Documents/Software/intermine/bio/tutorial/malariamine/malaria-data.tar.gz
Place this data in the the data directory, and extract it for use in the tutorial:
 mkdir ~/Documents/Data/intermine
 cd ~/Documents/Data/intermine
 cp ~/Documents/Software/intermine/bio/tutorial/malariamine/malaria-data.tar.gz .
 tar -zxvf malaria-data.tar.gz
You should now have a directory of data available at
/home/gmod/Documents/Data/intermine/malaria
The MineManager Graphical Installer
We are developing a graphical application to manage these stages, which we will use in this section of the workshop:
The MineManager is located in our source tree at
SVN_ROOT/intermine/MineManager.
Running it from the command line
To run it open a terminal and type the command:
/home/gmod/Documents/Software/intermine/intermine/MineManager/run
Running it from a clickable launcher
If you would prefer a point and click interface, on standard Linux desktops, you can run the launcher installer to obtain a runnable icon:
/home/gmod/Documents/Software/intermine/intermine/MineManager/install_launcher
You should then find a MineManager icon on your desktop, which you can double click to open the installer.
Welcome Screen
You should see a window like this:
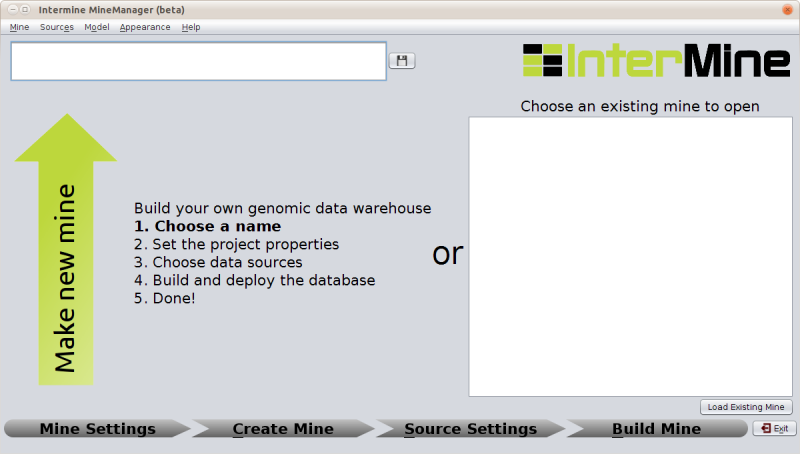
This installer will guide you through the install procedure in 4 steps to the point of having a working database that we can use to release a mine on.
Starting a new Mine
To do this enter a name in the box at the top and click on the save icon to the right of the text box. This will automatically open up the next stage of the mine creation process.
Setting up the new Mine’s properties
In order to proceed, we need to tell the installer where the InterMine source tree we are using is located. This is referred to here as InterMine Home. You can use the browse button on the top right of the Mine Information tab to select the appropriate directory:
/home/gmod/Documents/Software/intermine
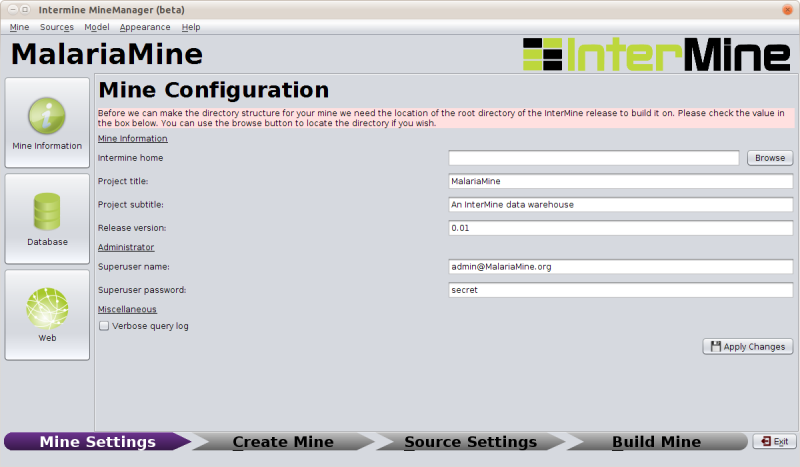
Once this form is completed and you have applied your changes you will be able to create your mine.
The Mine project directory
Creating the mine runs the make_mine script, which sets up the Java
project directories in the appropriate places, and then builds an
initial version of the data model. The structure of the mine’s project
directory is:
 SVN_ROOT/your_mine
         |
         + -- dbmodel/
         + -- integrate/
         + -- postprocess/
         + -- webapp/
         + -- project.xml
         + -- default.intermine.webapp.properties
         + -- default.intermine.integrate.properties
The four sub directories are each separate Java projects that manage the different stages of building and running a mine, pretty much in the order they appear.
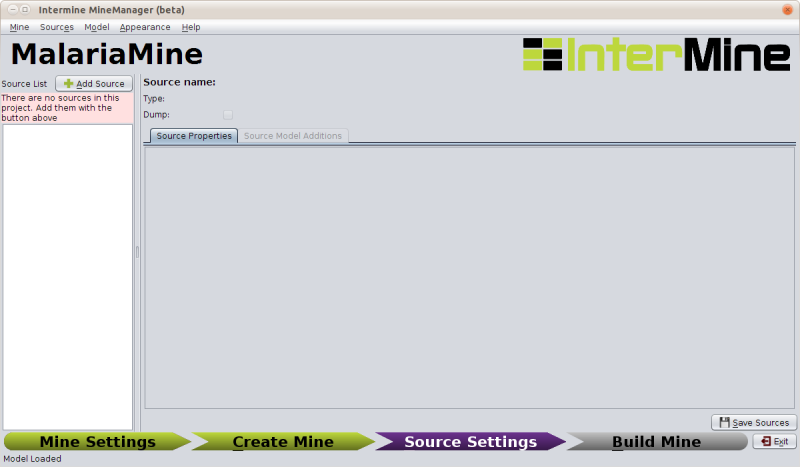
Adding Sources to a Project
The next section of the MineManager handles adding sources to a project:
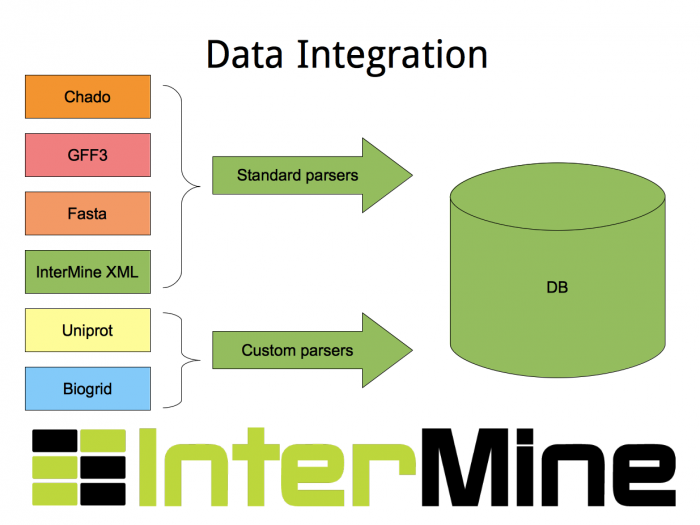
A source here refers to the combination of a datasource and a parser that reads the data into the database. We supply a large number of parsers with our source code for reading in data from common biological formats (including Chado, GFF3), and we supply the tools for writing your own parsers for datasources we don’t support out of the box.
Importing Protein Data From Uniprot
Click on add source, and then select uniprot as the source type from the drop-down list. (you can choose to name each source, but in this case uniprot is fine).
Once you add a source the section on the right will load up its specific configuration options.
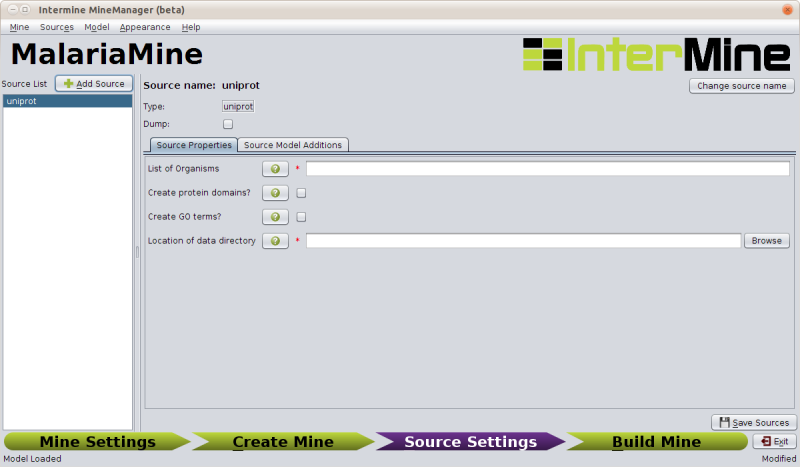
For uniprot the appropriate settings are:
| Field | Value |
|---|---|
| List of Organisms | 36329 |
| Create protein domains | TICKED |
| Create GO terms | UNTICKED |
| Location of data directory | /home/gmod/Documents/Data/malaria/uniprot |
To save this configuration so it is used in the build, select save sources from the bottom right, or when prompted.
Side Note: Model Additions
The Uniprot configuration section has a second tab named Source Model Additions, which specifies the addtions to the data model that a particular source brings with it. The uniprot source adds the following classes:
- Component
- UniprotFeature
And adds fields to the following classes:
- Gene
- GoAnnotation
- Protein
- ProteinDomain
If you select model → view model from the menu you can see how these classes and fields are integrated into the data model.
The GFF3 source
InterMine includes a parser to load valid GFF3 files. The creation of features, sequence features (usually chromosomes), locations and standard attributes is taken care of automatically.
The files we are loading are from PlasmoDB and contain gene, exon and mRNA features, there is one file per chromosome. Look at an example:
head ~/Documents/Data/intermine/malaria/genome/gff/MAL1.gff3
To add the GFF3 source to your MalariaMine:
- Select the Add source option on the Sources menu.
- Choose malaria-gff
- Click the add button and save your sources.
The properties set for malaria-gff are:
| Field | Value | Notes |
|---|---|---|
| gff3.seqClsName | Chromosome | the ids in the first column represent Chromosome objects, e.g. MAL1 |
| gff3.taxonId | 36329 | taxon id of malaria |
| gff3.dataSourceName | PlasmoDB | the data source for features and their identifiers, this is used for the DataSet (evidence) and synonyms. |
| gff3.seqDataSourceName | PlasmoDB | the source of the seqids (chromosomes) is sometimes different to the features described |
| gff3.dataSetTitle | PlasmoDB P. falciparum genome | a DataSet object is created as evidence for the features, it is linked to a DataSource (PlasmoDB) |
| Location of Data Directory | /home/gmod/Documents/Data/intermine/malaria/genome/gff | Where we unpacked the data to |
FASTA files
FASTA is a minimal format for representing sequence data. Files comprise
a header with some identifier information preceded by ‘>’ and a
sequence. At present the InterMine FASTA parser loads just the first
entry in header after > and assigns it to be an attribute of the
feature created. Here we will load one FASTA file for each malaria
chromosome. Look at an example of the files we will load:
head ~/malaria/genome/fasta/MAL1.fasta
Add a fasta source to your Mine by following these steps:
- Select Add source option from the Sources menu
- Select the fasta type and name your source malaria-chromosome-fasta. Note: you must use this name as there is an integration keys set of this name predefined for you. We will deal with keys in more detail in the custom source section.
- Click the add button and save your changes.
The following properties should be defined for malaria-chromosome-fasta:
| Field | Value | Notes |
|---|---|---|
| FASTA Class Name | org.intermine.model.bio.Chromosome | the type of feature that each sequence is for |
| fasta.dataSourceName | PlasmoDB | the source of identifiers to be created |
| Dataset Name | PlasmoDB chromosome sequence | a DataSet object is created as evidence |
| Taxon ID | 36329 | the organism id for Plasmodium falciparum |
| Location of Data Directory | /home/gmod/Documents/Data/intermine/malaria/genome/fasta | Where we unpacked the data to before |
Entrez Organism
Some sources depend on other sources, usually in order to complete the database with fields that can be derived or fetched in some way, Entrez Organism is one of these. It fetches organism names from Entrez. Add this source to the mine - it does not need any special configuration.
Loading Custom Data Sources
As well as the standard data loaders that ship with the InterMine source tree, we supply a tool-chain for building your own data loaders for any custom data source. There are APIs for this tool-chain in Java and Perl. The next section will walk us through loading a custom data source by using the Perl data loading API.
Tool-chain details
- Java - data loaders are written by sub-classing one of a set of
basic data loading classes (eg.
org.intermine.bio.dataconversion.BioFileConverter), which provide a scaffold. - Perl - data is loaded in a two stage process, by first using a set of Perl modules to convert your data into our XML format, which is then loaded into the database using a core dataloader.
Installing the Perl tool-chain
The Perl modules are located in our source tree at:
SVN_ROOT/intermine/perl/InterMine-Item
and can be installed in the standard manner with the commands:
  perl Build.PL
  sudo ./Build installdeps [if you don't have the pre-requisites]
  ./Build test [optional]
  sudo ./Build install
Or the entire procedure above can be automated with your preferred CPAN
client by installing InterMine::Item. eg:
cpan InterMine::Item
Our example dataset
First let’s look at the data we will be adding to the database. In this tutorial we will use data from the KEGG pathway database. In their words:
“KEGG PATHWAY mapping is the process to map molecular datasets, especially large-scale datasets in genomics, transcriptomics, proteomics, and metabolomics, to the KEGG pathway maps for biological interpretaion of higher-level systemic functions.”
Specifically, the data we have will provide mappings between genes and KEGG pathways. It takes the form of two files in /home/gmod/Documents/Data/malaria/kegg, look at these now.
pfa_gene_map.tab- this has two tab delimited columns:- the first is the identifier of a malaria gene, note these are the same ids we have used for `Gene.primaryIdentifier` in other sources.
- the second is a space separated list of KEGG pathway ids that the gene is involved in
map_title.tab- also has two tab delimited columns:- the first is a KEGG pathway identifier
- the second the descriptive name of the pathway
Our parsing strategy
We will
- Create data items for the data source, data set, and organism
- Read in the pathways file
- Create a data item for each pathway in the file
- Remember which item was made for each id
- Read in the gene mappings file
- Create a data item for each gene in the file, linked to the pathway items made earlier
Adding The Source
There a couple of custom source types; since we will be using the Perl toolchain, add a new source of the type intermine-items-xml, and set the name to something sensible, such as kegg-pathways.
An Example Implementation of this Strategy
Click on open parser to edit and paste in the script below:
#!/usr/bin/perl

use warnings;
use strict;
use InterMine::Model;
use InterMine::Item::Document;

@ARGV == 4 or die "Bad arguments: we need four arguments\n$0 model-file output-file pathways-file gene-mappings-file\n";

my ( $model_file, $out_file, $pathway_file, $gene_mappings_file ) = @ARGV;

# Create the writing apparatus
my $model = InterMine::Model->new( file => $model_file );
my $document = InterMine::Item::Document->new(
    model      => $model,
    output     => $out_file,
    auto_write => 1,
);

my $data_source = 'Kegg';
my $taxon_id = 36329;
my %pathway_with;

# Create data items for the data source, data set, and organism

my $datasource_item = $document->add_item(
    'DataSource',
    'name' => $data_source,
);

my $dataset_item = $document->add_item(
    'DataSet',
    name       => $data_source . ' data set for taxon id: ' . $taxon_id,
    dataSource => $datasource_item,
);

my $org_item = $document->add_item(
    'Organism',
    taxonId  => $taxon_id,
);

# Read in the pathways file
open(my $pathways, '<', $pathway_file) or die "Could not open $pathway_file, $!";
for (<$pathways>) {
    chomp;
    my ($id, $title) = split(/\t/);

    ## Create a data item for each pathway in the file
    ## Remember which item was made for each id
    $pathway_with{$id} = $document->add_item(
        'Pathway',
        identifier => $id,
        name       => $title,
    );
}
close $pathways or die "Could not close $pathway_file, $!";

# Read in the gene mappings file
open(my $gene_mappings, '<', $gene_mappings_file) or die "Couldn't open $gene_mappings_file, $!";
for (<$gene_mappings>) {
    chomp;
    my ($gene_id, $pathway_string) = split(/\t/);
    my @pathway_ids = split(/\s/, $pathway_string);
    my $pathway_items = [@pathway_with{@pathway_ids}];

    ## Create a data item for each gene in the file, linked to the pathway items made earlier
    $document->add_item('Gene',
       primaryIdentifier => $gene_id,
       organism          => $org_item,
       pathways          => $pathway_items,
       dataSets          => [$dataset_item],
    );
}
close $gene_mappings or die "Could not close $gene_mappings_file, $!";

# Close the document
$document->close();

exit;
Additions
Our Model currently has no class “Pathway” (as you can confirm by browsing the model). We need to add it, and the Gene ↔ Pathway link. We can do this by using the Source Model Additions editor.
- Add a new class and name it Pathway
- Add an attribute in this class and name it name, with the type set to String
- Add an attribute in this class and name it identifier, with the type set to String
- Add a collection in this class and name it genes, with the type set to Gene and a reverse reference named pathways
- Click yes when asked if you want to make the reverse reference
- Change the field-type of the new reverse reference in the Gene class to collection
- Click no when asked if you want to make the reverse reference.
You should end up with:
Gene
| FieldType | Name | Type | Reverse-Reference |
|---|---|---|---|
| Collection | pathways | Pathway | genes |
Pathway
| FieldType | Name | Type | Reverse-Reference |
|---|---|---|---|
| Attribute | name | String | - |
| Attribute | identifier | String | - |
| Collection | genes | Gene | pathways |
Once these are added, if you reload the model, you should find the new Pathway class as part of the model
Dealing With Integration
As we are adding gene data from this source in addition to the other genes already in the database, we need to make sure they play nicely together. We do this by setting up “integration keys” that tell the integration process how to identify when we are adding details about an object we already have in the database, rather than adding an entirely new one.
To do this, on the source properties tab of the source details panel, click on Open keys file to edit the integration keys.
We already have keys defined for DataSet and DataSource: we only need to add the following line:
Gene.key = primaryIdentifier
We do not need to add a key for Pathway, as we are not adding pathways data from any other source.
Generating the XML
Now we are ready to generate the XML using our parser. First we need to generate the model:
  cd ~/Documents/Software/intermine/malariamine/dbmodel
  ant build-db
And now we can run our parser and generate XML
  perl ~/Documents/Software/intermine/bio/sources/kegg-pathways/kegg-pathways_parser.pl \
    ~/Documents/Software/intermine/malariamine/dbmodel/build/model/genomic_model.xml \
    ~/Documents/Data/intermine/malaria/kegg/pathways.xml \
    ~/Documents/Data/intermine/malaria/kegg/map_title.tab \
    ~/Documents/Data/intermine/malaria/kegg/pfa_gene_map.tab
And then finally tell our mine where the data is by filling in the Data file location in the kegg-pathways source properties section to /home/gmod/Documents/Data/intermine/malaria/kegg/pathways.xml
Running a Build
The build section of the MineManager runs the build process (a
front-end for our project-build script).
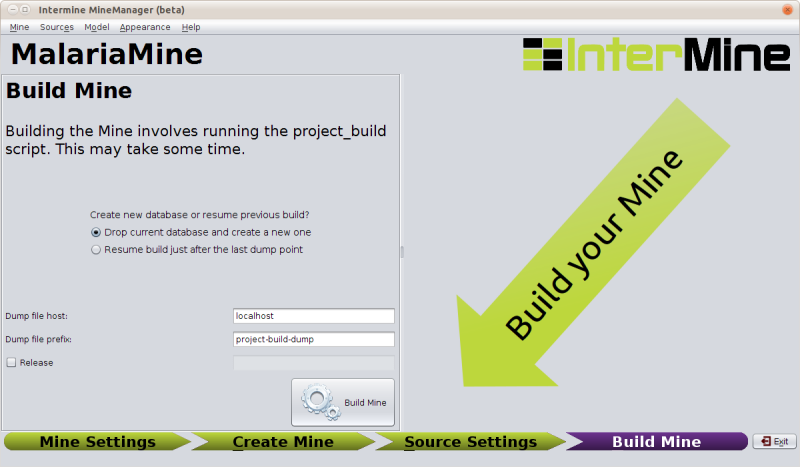
If you click build and there are problems with your configuration that would prevent a successful build, the MineManager will catch that and tell you:

In this case we would need to go back to the database options in the first section (Mine Settings → Database → create databases).
After a successful build, you will see a summary of the time taken at each stage:
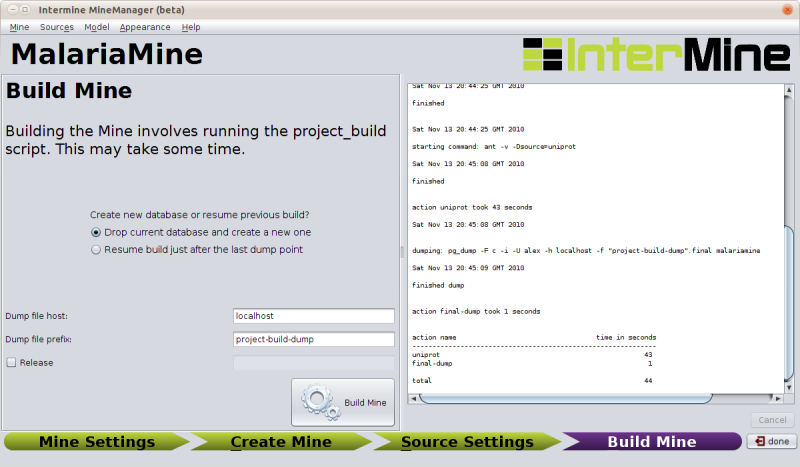
The sources we have set up above should take about 650 sec (give or take) to integrate into the database ∴ time for a break!
Deployment
Once you have read access to a production database, you can build and release a web application against it.
Configuration
If you haven’t already, use the MineManager to configure the tomcat properties (Mine Settings → Web Settings):
Uses these settings for the tutorial (the tomcat settings refer to a preconfigured tomcat role).
| Field | Value | Notes |
|---|---|---|
| tomcat username | manager | The name of a tomcat administrator |
| tomcat password | manager | the password for the tomcat administrator |
| superuser username | choose a name | The name for the webapp administrator |
| superuser password | choose a password | The password for the webapp administrator |
UserProfile Initialisation
In addition to the ObjectStore DB which contains your data, there is a separate database which holds user information (accounts, saved preferences, query history, lists, templates, etc) and general webapp configuration (which technically all belongs to the superuser).
Since this mine is new, we need to build a new one (we will only ever need to do this once - repeating this step at a later date will delete all your users’ data).
To build the database:
NOTE: This command will delete any data in the userprofile database.
 cd ~/Documents/Software/intermine/malariamine/webapp
 ant build-db-userprofile
This command creates the SuperUser account and loads the
default-template-queries.xml file.
Starting the Tomcat Webserver
Tomcat is the webserver we use to serve InterMine webapps. Start Tomcat with this command:
 cd ~/Documents/Software/tomcat6
 bin/startup.sh
Visit the Tomcat manager at http://localhost:8080/. The username and password required to access the manager are manager and manager
Deploying the Webapp to Tomcat
Run the following command to release your webapp:
 cd ~/Documents/Software/intermine/malariamine/webapp
 ant clean default remove-webapp release-webapp
This will fetch the model from the database and generate the model java code, remove and release the webapp. The default target forces a rebuild of the .war file. (The clean is not always necessary, but it doesn’t hurt to include it, and remove-webapp is only really required when you have previously released before).
Visit your newly minted mine: http://localhost:8080/malariamine
Accessing Your Data Through the Webapp
In this section we will look at how you can examine, analyse and aggregate your data in the webapp, looking both at the webapp you have built, and FlyMine.
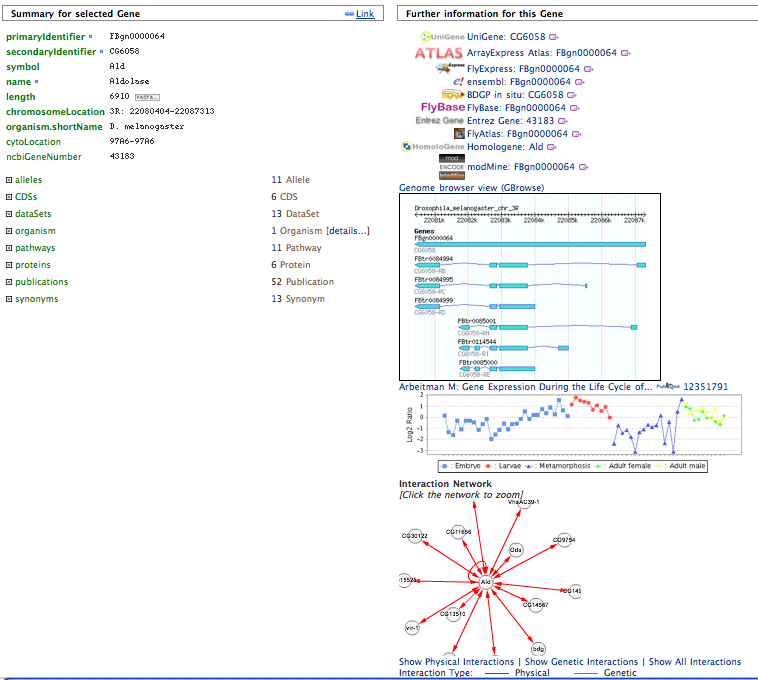
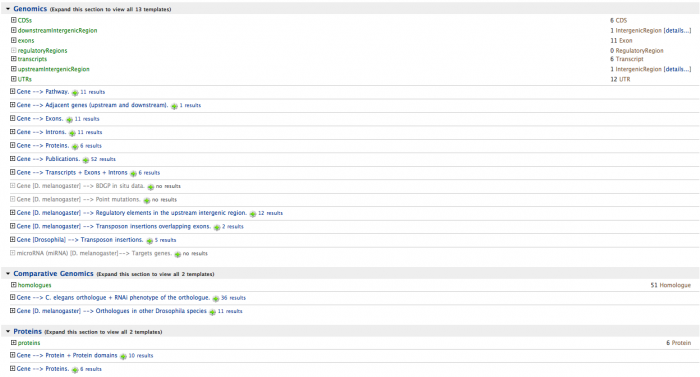
Single Objects (Report Pages)
Each object in the database (each Gene, Chromosome, Exon, Protein, etc) will have a report page that can display:
- The properties of the object
- Links to other objects this object references
- Widgets that display data about the object (GBrowse/Cytoscape)
- Links to sites that contain information about the objects
- Homologues of the object in other organisms/mines
- Templates that you can run on the given object, and the number of results you can expect.
In the top right there is a search box which uses the Lucene quick-search. Enter ald to find the Aldolase gene.
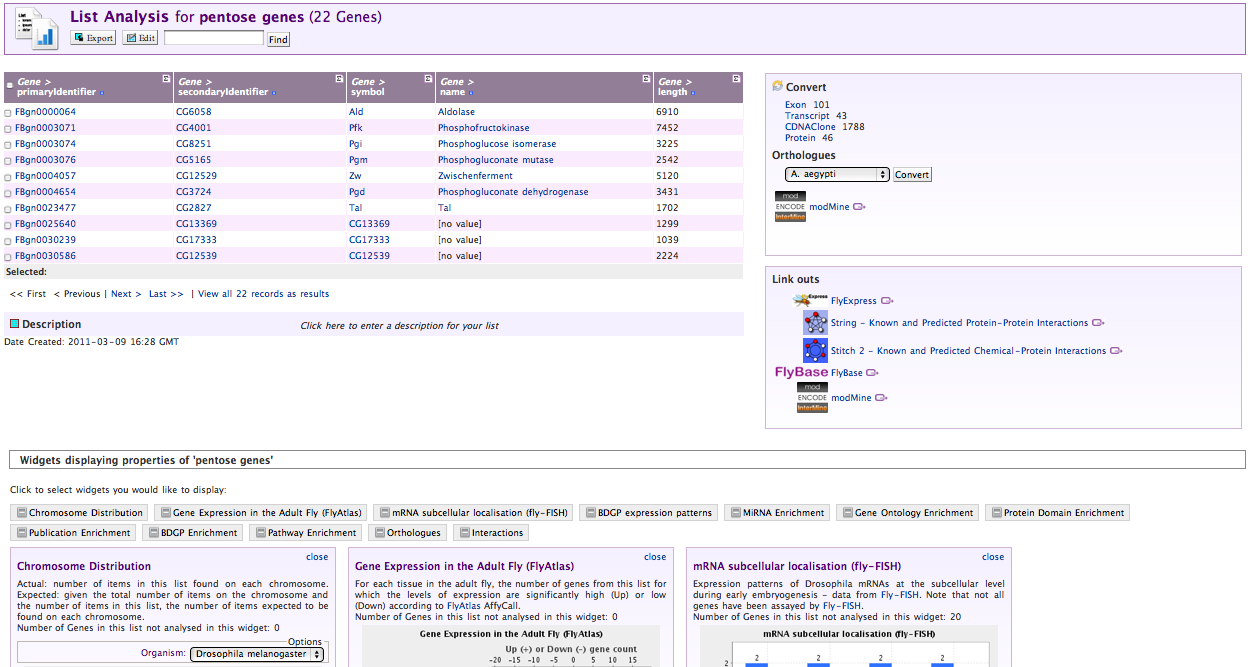
Multiple Objects (Lists)
Lists of Objects of any type can be made and explored. The pages that display data on these lists are called “List Report Pages”, and can display:
- The properties of the objects in the list
- Links to tools in other sites
- Tools that convert a list into:
- A list of a different type: (eg. gene → exon)
- A list of orthologues
- Tools that aggregate data over the list:
- Enrichment
- Distribution
- Expression
- Localisation
- Queries run on all objects in the list
Click the Lists tab to see the lists section. Here you can either:
- Upload a list of identifiers to create a new list
- View an existing list.
On the list view page you can perform set logic on lists of objects (intersection/union/etc) to derive new lists.
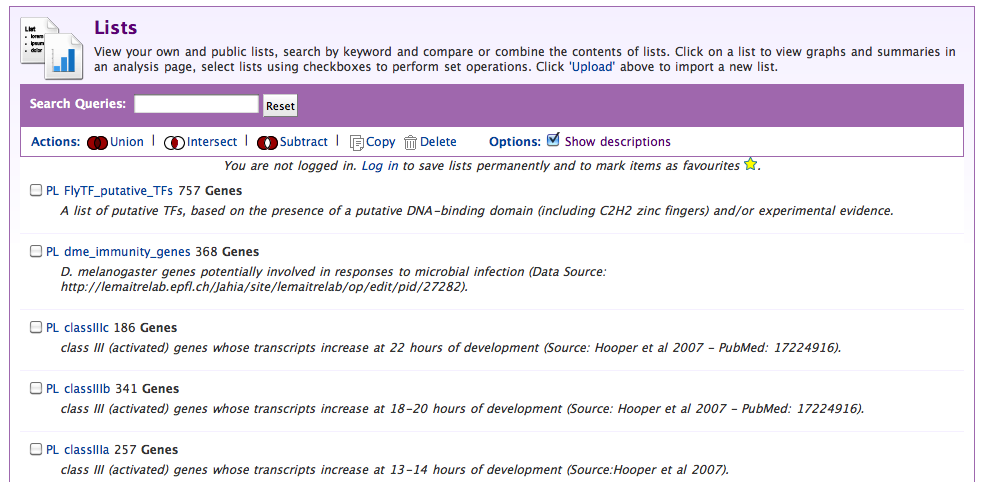
From the view sub-tab, select a list you think looks interesting:
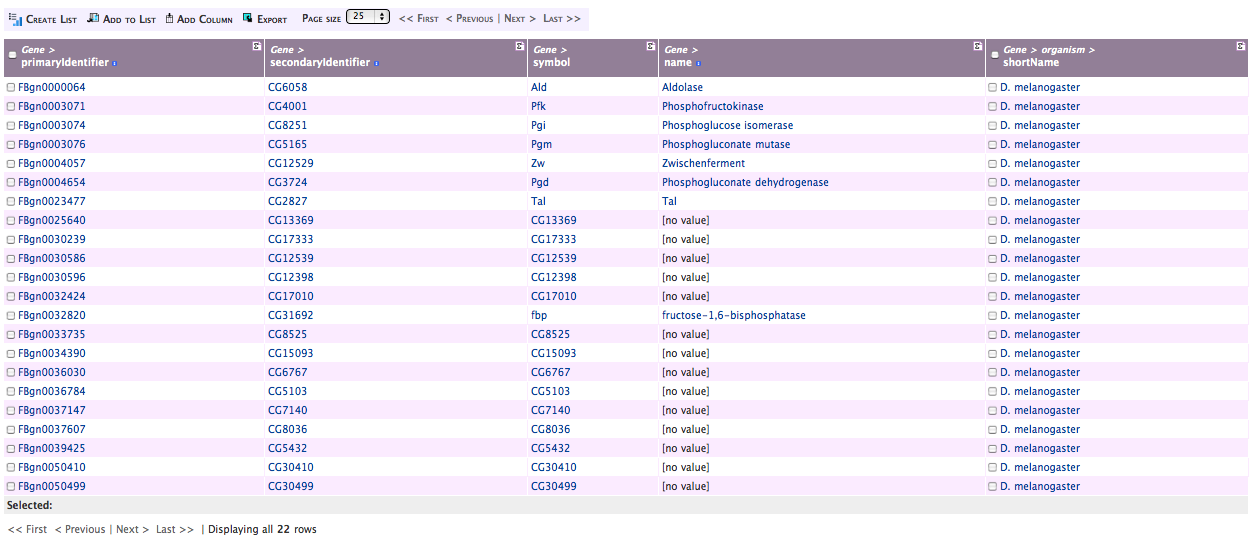
Exporting Data and Summarising Columns
When viewing lists or Query results these two actions are always available:
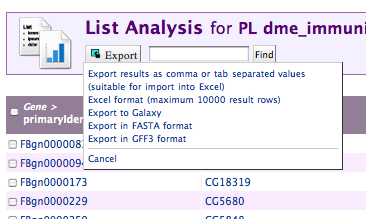
Exporting Data
Data can be exported from Lists and Query results in a number of formats:
- Flat file formats (TSV/CSV)
- Excel .xls format
- GFF3
- Fasta
- Galaxy (for use in a workflow)
The export link is always in the top left of the page:
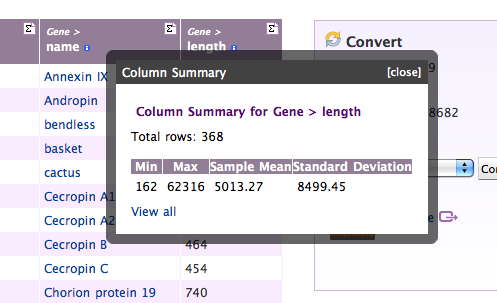
Viewing Column Summaries
Each column header also has a summary symbol (Σ) which helps you get an overview over the data contained in that column:
Running Queries
Queries in the webapp are created and run using the QueryBuilder interface, which helps you build queries using the data model as a guide.
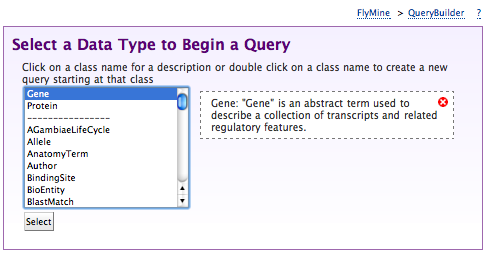
- Click on the QueryBuilder tab
- Select gene as the type of object we want to query for
- Click summary next to gene in the Model browser
- Scroll down to pathways
- Expand the pathways collection
- Click constrain next to name
- Type in p into the value box in the pop-up
- Select Pentose Phosphate Pathway from the autocomplete
drop-down
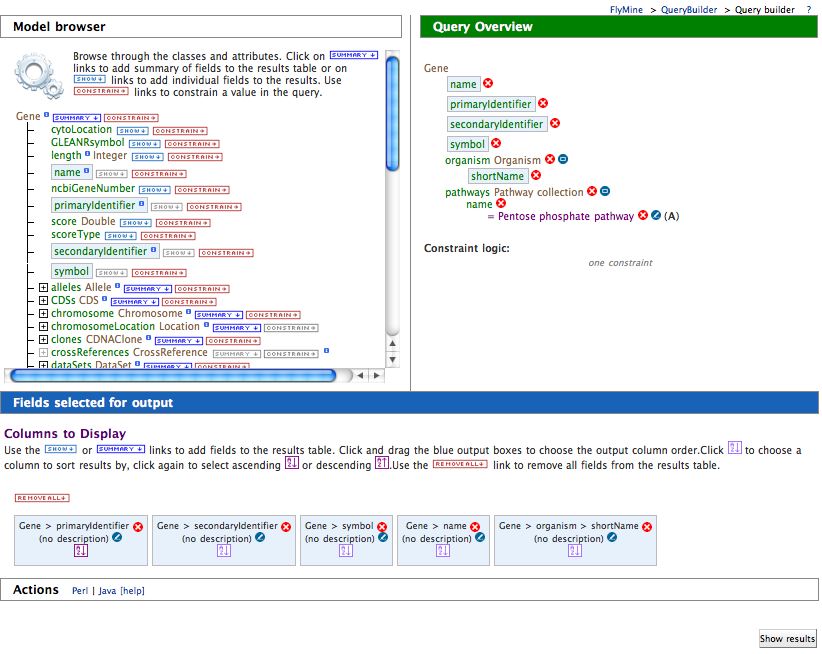
- Select Show results
You should see results like this:
Making Lists from Query Results
The query results page provides links to the report pages of individual objects, and we can create lists of the objects returned. To create a list, click the check-box in the header of the column containing the type of object you want to make into a list, here, any of the gene fields:
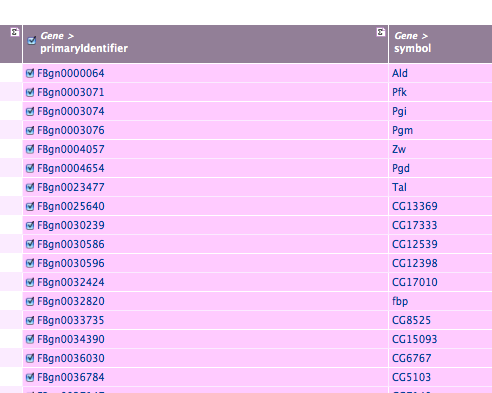
Then name your list:
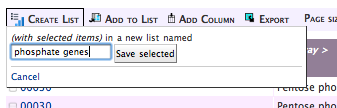
And you’re done.
Running Templates
Templates are queries that have been pre-written and saved for later re-use, either by and for a single user, or for all the users of the mine. Rather than running the same query over and over, they allow for their parameters to be changed, and they automatically present a simple web-form interface.
When we build our mine we included a number of default templates, and large mines such as FlyMine have many more. Click on the Templates tab to see what templates are available (you can type a name, or part of a name into the box at the top to filter the list of templates):
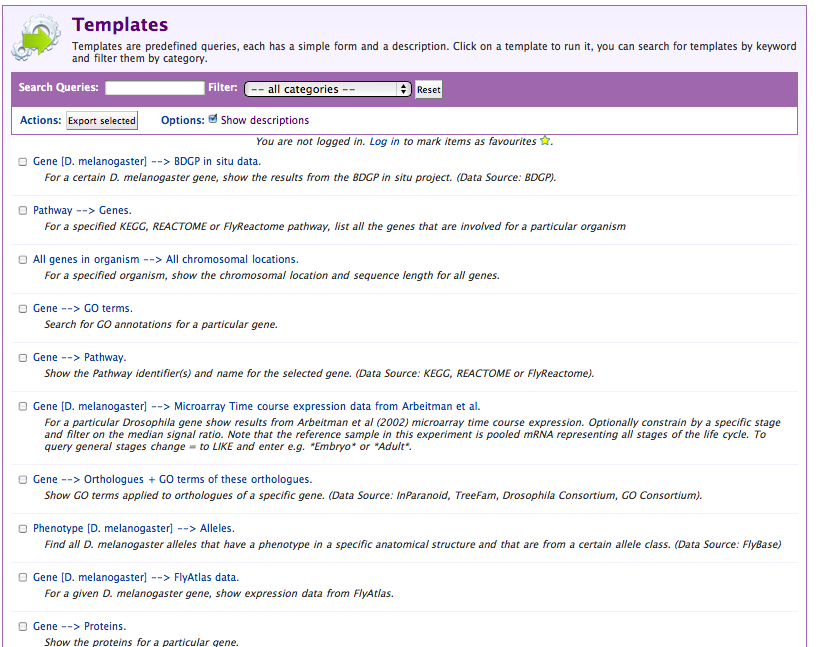
Select the Pathway → Genes template to see how the template interface differs from the query interface:
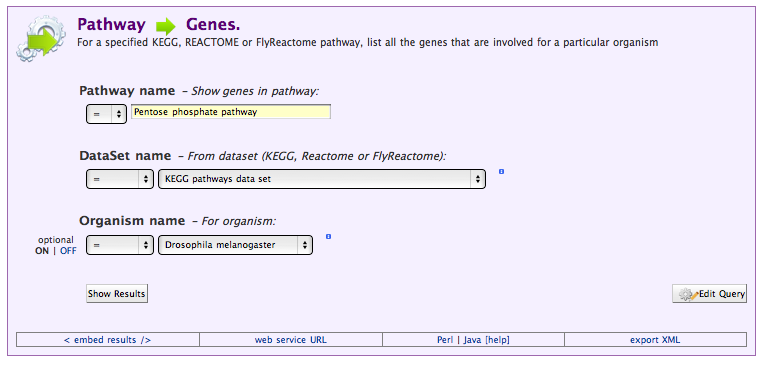
Running this query should get us the same results (more or less) than the query we wrote ourselves. To see where it might differ, we can view the underlying query by selecting Edit Query.
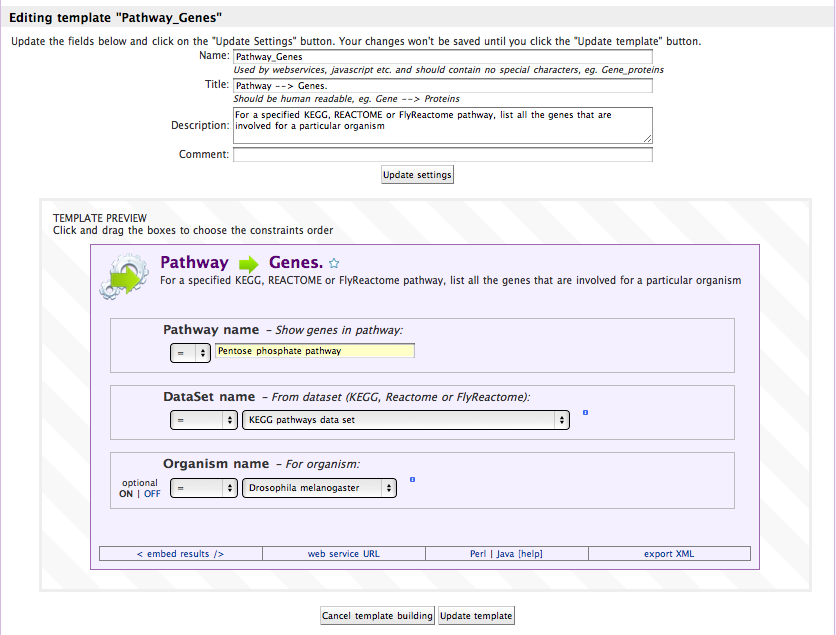
Making Templates
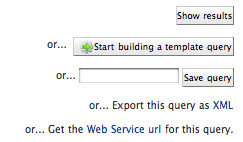
To make templates you and others can use later, you need to be logged in. When you are, you will be able to edit templates that belong to you, and make new templates:
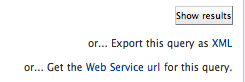
Making a template is as simple as making a query, and then clicking start building a template query.
You can choose what constraints are shown to the user (whether they are editable or not), and whether they are required or optional.
Accessing Your Data through the Webservice
As well as the graphical webapp interface, each mine also offers a webservice that exposes an external, scriptable programmatic API to the data (although this can be turned off at deployment). The webservice takes the form of a RESTful(-ish) set of resource paths, that accept either GET or POST HTTP requests (for further details see here).
Raw URLs
Anything you can do with the webservice ultimately boils down to requests to urls, and the clients we provide are simply ways to generate and validate urls, and manage the results they return. An example of a websevice url is:
http://preview.flymine.org/preview/service/template/results?name=Gene_Protein&constraint1=Gene&op1=LOOKUP&value1=big&extra1=&size=10&format=jsonobjects
Here the different parts are:
http://preview.flymine.org/preview/service
The base url for this service
template/results
The resource path (in this case, results for templates)
?name=Gene_Protein&constraint1=Gene&op1=LOOKUP&value1=big&extra1=&size=10&format=jsonobjects
The query string, a URL-encoded name-value pair set that tells the
resource what we want to do
Asking the Webapp to generate them for you
Obviously generating these urls is possible, but non-obvious. The simplest way to get a url for a query you want to run again is to ask the webapp to generate it for you. You can do this when you are on the edit query page or a template form page by selecting the webservice url link at the bottom of the page:
This will get you a url you can use with wget or curl, although it will be difficult to edit and adjust.
The Command-Line utilities
For very simple applications of the webservice, we also provide command line utilities that can take a query as XML or a template as a name and a list of parameters and return you the result as a flat-file. This is much more readable than simply using URLs.
(The command line utilities are installed automatically when the Perl Webservice client modules are installed)
Getting XML from the Webapp
Queries are represented in the webservice as XML strings, and rather than having to write them yourself (although you can), again the webservice will generate this for you if you want. Just select Query XML at the bottom of the page:
Which in the case of our pathways query would look like this:
<query name="" model="genomic" view="Pathway.identifier Pathway.name Pathway.genes.primaryIdentifier Pathway.genes.symbol"
  longDescription="For a specified KEGG, REACTOME or FlyReactome pathway, list all the genes that are involved for a particular organism"
  sortOrder="Pathway.identifier asc" constraintLogic="B and C and A">
  <pathDescription pathString="Pathway.genes" description="Gene"/>
  <constraint path="Pathway.name" code="A" op="=" value="Pentose phosphate pathway"/>
  <constraint path="Pathway.dataSets.name" code="B" op="=" value="KEGG pathways data set"/>
  <constraint path="Pathway.genes.organism.name" code="C" op="=" value="Drosophila melanogaster"/>
</query>
To run the xml you got, then use the run-im-query program:
run-im-query --url www.flymine.org/query path/to/query.xml
Running Templates
To run a template all we need is the name of the template, and the parameters we want to specify. This information is all included in the query string part of the webservice url. For example, to make a command line request for the pathways → genes template we can run the following command:
run-im-template --url www.flymine.org/query --title Pathway_Genes value1="Pentose phosphate pathway" value2="Drosophila melanogaster" value3="KEGG pathways data set"
Access from Perl & Java programs
To simplify access to the webservice from Perl and Java programs, we supply client software to run queries with. This software is included in our source tree:
- Perl:
~/Documents/Software/intermine/perl/Webservice-InterMine - Java:
~/Documents/Software/intermine/webservice/client
But the easiest way to install these clients is respectively:
- Perl: install with a cpan client:
cpan Webservice::InterMine
- Java: download the client package from the appropriate webapp, by visiting the API tab
Webapp/Webservice Integration
Each mine now includes an API tab that provides links and guidance on
using the programmatic client software. To get the Java client package
for a particular webservice, make sure to click on the Java subtab
(in the top-left), and then click the download link in the first
section. 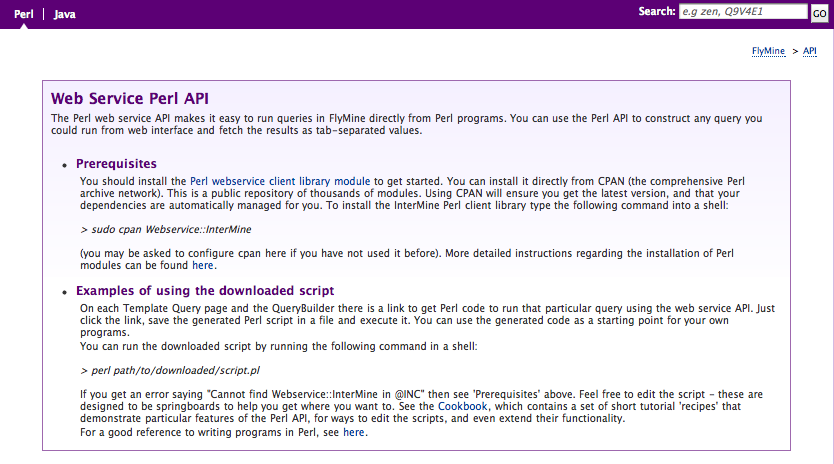
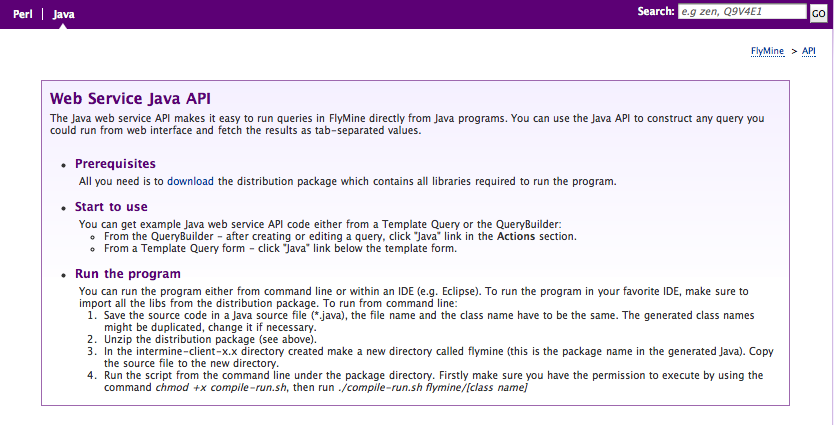
In addition to this help page, every query and template you visit will offer to write a script or a java program for you that you can just save and run. To get this, click on the Perl or Java link to see the generated code:
Additional help is provided at the CPAN:
http://search.cpan.org/perldoc?Webservice::InterMine,
or though the use of the perldoc command:
perldoc Webservice::InterMine
Accessing Templates
The following is the complete code you would get by clicking on the Perl link above:
use Webservice::InterMine 0.9412 'http://www.flymine.org/release-27.0/service';

# This is an automatically generated script to run the FlyMine template
# You should install the Webservice::InterMine modules to run this example, e.g. sudo cpan Webservice::InterMine

# template name - Pathway_Genes
# template description - For a specified KEGG, REACTOME or FlyReactome pathway, list all the genes that are involved for a particular organism

my $template = Webservice::InterMine->template('Pathway_Genes')
    or die 'Could not find template';

# You can edit the constraint values below
# A    Pathway.name    Show genes in pathway:
# B    Pathway.dataSets.name    From dataset (KEGG, Reactome or FlyReactome):
# C    Pathway.genes.organism.name    For organism:

my $results = $template->results_with(
    opA    => '=',
    valueA => 'Pentose phosphate pathway',
    opB    => '=',
    valueB => 'KEGG pathways data set',
    opC    => '=',
    valueC => 'Drosophila melanogaster',
    as     => 'string',
);

print $results."\n";
The equivalent Java query would look like this:
package flymine;

import java.util.ArrayList;
import java.util.List;

import org.intermine.webservice.client.core.ServiceFactory;
import org.intermine.webservice.client.services.TemplateService;
import org.intermine.webservice.client.template.TemplateParameter;

/**
 * This is an automatically generated Java program to run the FlyMine template.
 * template name - Pathway_Genes
 * template description - For a specified KEGG, REACTOME or FlyReactome pathway, list all the genes that are involved for a particular organism
 *
 * @author FlyMine
 *
 */
public class TemplatePathwayGenes
{
    private static String serviceRootUrl = "http://www.flymine.org/release-27.0/service";

    /**
     * @param args command line arguments
     */
    public static void main(String[] args) {

        TemplateService service = new ServiceFactory(serviceRootUrl, "TemplateService").getTemplateService();

        List<TemplateParameter> parameters = new ArrayList<TemplateParameter>();

        // You can edit the constraint values below
        // Constraint description - Show genes in pathway:
        parameters.add(new TemplateParameter("Pathway.name", "eq", "Pentose phosphate pathway"));
        // Constraint description - From dataset (KEGG, Reactome or FlyReactome):
        parameters.add(new TemplateParameter("Pathway.dataSets.name", "eq", "KEGG pathways data set"));
        // Constraint description - For organism:
        parameters.add(new TemplateParameter("Pathway.genes.organism.name", "eq", "Drosophila melanogaster"));

        // Name of a public template, private templates are not supported at the moment
        String templateName = "Pathway_Genes";

        // Number of results are fetched
        int maxCount = 10000;
        List<List<String>> result = service.getResult(templateName, parameters, maxCount);
        System.out.print("Results: \n");
        for (List<String> row : result) {
            for (String cell : row) {
                System.out.print(cell + " ");
            }
            System.out.print("\n");
        }
    }
}
Accessing Queries
The Perl to access the same underlying query as that above using the query service would look like this:
use Webservice::InterMine 0.9412 'http://www.flymine.org/release-27.0/service';

# This is an automatically generated script to run the FlyMine query
# You should install the Webservice::InterMine modules to run this example, e.g. sudo cpan Webservice::InterMine

# query description - For a specified KEGG, REACTOME or FlyReactome pathway, list all the genes that are involved for a particular organism

my $query = Webservice::InterMine->new_query;

# The view specifies the output columns
$query->add_view(qw/
    Pathway.identifier
    Pathway.name
    Pathway.genes.primaryIdentifier
    Pathway.genes.symbol
/);

# Sort by
$query->set_sort_order('Pathway.identifier' => 'ASC');

# You can edit the constraint values below
$query->add_constraint(
    path  => 'Pathway.name',
    op    => '=',
    value => 'Pentose phosphate pathway',
    code => 'A',
);

$query->add_constraint(
    path  => 'Pathway.dataSets.name',
    op    => '=',
    value => 'KEGG pathways data set',
    code => 'B',
);

$query->add_constraint(
    path  => 'Pathway.genes.organism.name',
    op    => '=',
    value => 'Drosophila melanogaster',
    code => 'C',
);

# Constraint Logic
$query->logic('B and C and A');

print $query->results(as => 'string')."\n";
The equivalent Java would look like this:
package flymine;

import java.io.IOException;
import java.util.List;

import org.intermine.metadata.Model;
import org.intermine.webservice.client.core.ServiceFactory;
import org.intermine.webservice.client.services.ModelService;
import org.intermine.webservice.client.services.QueryService;
import org.intermine.pathquery.PathQuery;
import org.intermine.pathquery.OrderDirection;
import org.intermine.pathquery.Constraints;

/**
 * This is an automatically generated Java program to run the FlyMine query.
 *
 * @author FlyMine
 *
 */
public class QueryClient
{
    private static String serviceRootUrl = "http://www.flymine.org/release-27.0/service";

    /**
     * @param args command line arguments
     * @throws IOException
     */
    public static void main(String[] args) {
        QueryService service =
            new ServiceFactory(serviceRootUrl, "QueryService").getQueryService();
        Model model = getModel();
        PathQuery query = new PathQuery(model);

        // Add views
        query.addViews("Pathway.identifier",
                "Pathway.name",
                "Pathway.genes.primaryIdentifier",
                "Pathway.genes.symbol");

        // Add orderby
        query.addOrderBy("Pathway.identifier", OrderDirection.ASC);

        // Add constraints and you can edit the constraint values below
        query.addConstraint(Constraints.eq("Pathway.name", "Pentose phosphate pathway"), "A");

        query.addConstraint(Constraints.eq("Pathway.dataSets.name", "KEGG pathways data set"), "B");

        query.addConstraint(Constraints.eq("Pathway.genes.organism.name", "Drosophila melanogaster"), "C");

        // Add constraintLogic
        query.setConstraintLogic("B and C and A");

        // Number of results are fetched
        int maxCount = 10000;
        List<List<String>> result = service.getResult(query, maxCount);
        System.out.print("Results: \n");
        for (List<String> row : result) {
            for (String cell : row) {
                System.out.print(cell + " ");
            }
            System.out.print("\n");
        }
    }

    private static Model getModel() {
        ModelService service = new ServiceFactory(serviceRootUrl, "ModelService").getModelService();
        return service.getModel();
    }
}
Data Formats
Thus far we have received all our results as tab-delimited rows of data, but there are other formats we can request:
Row Based Formats
tab
The default format - simple tab separated values
csv
As above, but comma separated, and double quoted
jsonrows
Row based json format:
http://intermine.org/wiki/JSONRowFormat
xml
Structured data format with the structure
<ResultSet><Row><i></i>...</Row>...</ResultSet>
Record Based Formats
We have one format (jsonobjects) that treats records as the unit of the query, returning an object with arbitrarily deep nesting of references and collections: see http://intermine.org/wiki/JSONRowFormat for more. You can see an example of the results in this format below:
{
  'rootClass': 'Gene',
  'modelName': 'genomic',
  'views':     ["Gene.primaryIdentifier", "Gene.symbol", "Gene.proteins.primaryAccession", "Gene.proteins.primaryIdentifier"],
  'executionTime':  '2011.01.14 13:32::14',
  'results':   [
    {
      "primaryIdentifier": null,
      "symbol":            null,
      "objectId":          1719268932,
      "class":             "Gene",
      "proteins":          [
        {
          "primaryAccession":  "A2AKB2",
          "primaryIdentifier": "A2AKB2_MOUSE",
          "objectId":          1719574559,
          "class":             "Protein"
        },
        {
          "primaryAccession":  "P61965",
          "primaryIdentifier": "WDR5_MOUSE",
          "objectId":          1719268927,
          "class":             "Protein"
        },
        {
          "primaryAccession":  "Q3UNQ3",
          "primaryIdentifier": "Q3UNQ3_MOUSE",
          "objectId":          1719447174,
          "class":             "Protein"
        }
      ]
    }
  ]
}
Getting the Total
Set the format to count
Access From Within the Browser
We have a javascript client as well, called IMBedding (http://www.intermine.org/imbedding) which enables queries to any Mine webservice from any browser, and display tables of data inline. Please look at the imbedding tutorial to see more, but an example is included below as a demonstration:
 <head>
    <!-- jQuery is hosted by Google -->
    <script src="https://ajax.googleapis.com/ajax/libs/jquery/1.4.4/jquery.min.js"
        type="text/javascript">
    </script>
    <!-- jquery-jsonp is likewise available from an online repository -->
    <script src="http://jquery-jsonp.googlecode.com/files/jquery.jsonp-2.1.4.min.js"
        type="text/javascript">
    </script>
    <!-- Similarly imbedding.js is hosted on intermine.org -->
    <script src="http://www.intermine.org/lib/imbedding/0.1/imbedding.min.js"
        type="text/javascript">
    </script>
 </head>

 <script type="text/javascript">
    IMBedding.setBaseUrl("http://preview.flymine.org/preview");
    IMBedding.loadTemplate(
        {
            name:           "Gene_RegionOverlappingTFbindingsite",

            constraint1:    "Gene",
            op1:            "LOOKUP",
            value1:         "CG2328",
            code1:          "A",
        },
        '#some-placeholder',
    );
 </script>