GMOD
Galaxy Tutorial 2012 Extras
Items shown on this page were part of earlier drafts of the 2012 Summer School Galaxy workshop. They were moved here either in the interests of time, or because they no longer fit well with other content. However, these sections are still informative.
Contents
- 1 Defining Genomes to Trackster
- 2 Adding a new tool
- 3 Configuring Galaxy (2)
- 4 A second example with NGS data
- 5 Making genome / alignment data available to Galaxy
Defining Genomes to Trackster
From the Learn/Visualization wiki page
Trackster needs chrom/contig length information for builds to be able to
be visualized, either in the form of .len files or custom user builds.
The former option allows all users to be able to use the build.
Trackster looks for the .len files in the
tool-data/shared/ucsc/chrom/ directory by default, but this location
can be configured in the universe_wsgi.ini file:
# Directory where chrom len files are kept, currently mainly used by trackster
#len_file_path = tool-data/shared/ucsc/chrom
For example, to enable visualization of hg18, a file called hg18.len
must exist in the previously specified folder. The contents of the
.len file is tab-delimited and specifies the length of each
chrom/contig of that build, each on a separate line, eg:
chr1    27473282
chr2    38882233
...
chrX    28883322
To populate this directory with common UCSC builds, run the following commands:
mkdir ./tool-data/shared/ucsc/chrom/
python ./cron/build_chrom_db.py ./tool-data/shared/ucsc/chrom/
To display a build’s genome data (i.e. bases/nucleotides) when
sufficiently zoomed in: (a) create a 2bit file from the genome’s fasta
file using faToTwoBit, which is available from UCSC’s tools (source,
executables and (b) add an entry to the tool-data/twobit.loc file to
indicate that where the build’s twobit file is located.
Finally, you will need to make sure your datatypes_conf.xml file
contains the necessary datatype converters that GTB uses, such as
bam_to_bai.xml, bed_to_tabix.xml, etc. If you have not made local
changes to datatypes_conf.xml, then simply copy everything from
datatypes_conf.xml.sample into datatypes_conf.xml to make sure you
have the latest copy.
Note: the above script will run for almost an hour
After restarting Galaxy, Trackster will now know about the size of all chromosomes for many genome builds.
Adding a new tool
Note: This was the “create a tool” example used in previous years. This year I switched the time to cover the Galaxy Tool Shed instead. However, this is such a nice example that I couldn’t delete it altogether. Dave C.
The SAM format contains 12 required fields representing
the read and the position it maps to, followed by a variable number of
optional fields of the form CODE:TYPE:VALUE. Suppose we want to
filter by these optional fields. We can whip up a quick command line
tool in Python (or perl, or awk, or…) to do this.
Let’s first create a directory for our new tool:
$ mkdir tools/gmod_2012
The tool command (script)
And then using a text editor,
create tools/gmod_2012/sam_filter.py containing:
#!/usr/bin/env python

"""
Usage: sam_filter.py input_file output_file flag value
"""

import sys

out = open( sys.argv[2], "w" )

for line in open( sys.argv[1] ):
    # Strip end of line and split on tabs
    fields = line.rstrip( "\r\n" ).split( "\t" )
    # Look only at optional fields
    write_line = False
    for field in fields[12:]:
        flag, type, value = field.split( ":" )
        if flag == sys.argv[3] and value == sys.argv[4]:
            write_line = True
    # If any optional field matched, keep the read
    if write_line:
        out.write( line )
The tool wrapper
Next, we need to create the tool configuration. Edit the file
tools/gmod_2012/sam_filter.xml and start with the following skeleton:
<tool id="sam_filter_1" name="SAM Filter">
    <command interpreter="python">

    </command>
    <inputs>

    </inputs>
    <outputs>

    </outputs>
</tool>
First, let’s define the output. This tool has a single output, of type
sam, so we modify the configuration to contain:
<tool id="sam_filter_1" name="SAM Filter">
    <command interpreter="python">

    </command>
    <inputs>

    </inputs>
    <outputs>
        <data name="output1" format="sam" />
    </outputs>
</tool>
The name can be anything, but it will be used later to identify the output file in the command line. Second, let’s define the following inputs
- An input dataset of type
sam - An input flag, which is selected from a predefined set
- An input value, which can be any text
The resulting configuration:
<tool id="sam_filter_1" name="SAM Filter">
    <command interpreter="python">

    </command>
    <inputs>
        <param type="data" format="sam" name="input1" label="File to filter"/>
        <param type="select" name="flag" label="Optional field to filter on">
            <option value="NM">Edit Distance</option>
            <option value="MD">Mismatching positions / bases</option>
        <option value="AS">Alignment score</option>
        </param>
    <param type="text" name="value" label="Value to require for flag"/>
    </inputs>
    <outputs>
        <data name="output1" format="sam" />
    </outputs>
</tool>
Finally, we define how to construct our command line based on values for the inputs. The command line is a template, where we can substitute in the value of each input (filenames in the case of datasets). Thus our final tool configuration is:
<tool id="sam_filter_1" name="SAM Filter">
    <command interpreter="python">
        sam_filter.py $input1 $output1 $flag $value
    </command>
    <inputs>
        <param type="data" format="sam" name="input1" label="File to filter"/>
        <param type="select" name="flag" label="Optional field to filter on">
            <option value="NM">Edit Distance</option>
            <option value="MD">Mismatching positions / bases</option>
        <option value="AS">Alignment score</option>
        </param>
    <param type="text" name="value" label="Value to require for flag"/>
    </inputs>
    <outputs>
        <data name="output1" format="sam" />
    </outputs>
</tool>
We now need to modify tool_conf.xml to register our new tool and run
Galaxy. Modify the top of tool_conf.xml to look like:
<?xml version="1.0"?>
<toolbox>
  <section name="GMOD 2012 Course Tools" id="gmod_2012">
    <tool file="gmod_2012/sam_filter.xml"/>
  </section>
  ...
and run Galaxy using
$ sh run.sh --reload
Running the new tool
Return to the Galaxy web interface and from the Tools panel and select GMOD 2012 Course Tools → SAM Filter.
The dataset 3: Map with BWA… should already be selected. Because we defined the type of data the tool can accept, Galaxy knows this is the only dataset in our history that is valid.
Select Edit distance for the flag, enter 0 for the value, and click Execute.

We know have a new dataset 4: Sam Filter on data 3 which contains only reads that mapped exactly to the reference.

Configuring Galaxy (2)
Tool dependencies
In the example above, we added a new tool to the default Galaxy installation. This included, adding the new tool to the Tools panel. However, many of the tools that are listed in the default Tools panel need additional software installed before they will work (we are currently working on an enhanced dependency management system to make this easier).
Suppose we’d like to analyze some Illumina datasets. We see that the
Map with BWA tool requires us to install
BWA (surprise!). To save time, BWA is already
compiled on the AMI, so let’s copy it to a location on the PATH:
$ sudo cp /home/ubuntu/Galaxy/BWA/bwa-0.6.2/bwa /usr/local/bin
Now bwa can be run from the command line:
$ bwa

Program: bwa (alignment via Burrows-Wheeler transformation)
Version: 0.6.2-r126
Contact: Heng Li <lh3@sanger.ac.uk>

...
The Galaxy tool also requires a loc file which contains the locations
of indexes for locally stored genome builds. We don’t have any, so we
can just use the empty sample:
$ cp tool-data/bwa_index.loc.sample tool-data/bwa_index.loc
and then start Galaxy
$ sh run.sh --reload
A second example with NGS data
Having made these changes and restarted Galaxy, access it at Template:YourUrlGalaxy.
You will notice that your history has been lost. This is the result of moving to Postgres. On startup, Galaxy will again have created a new database from scratch.
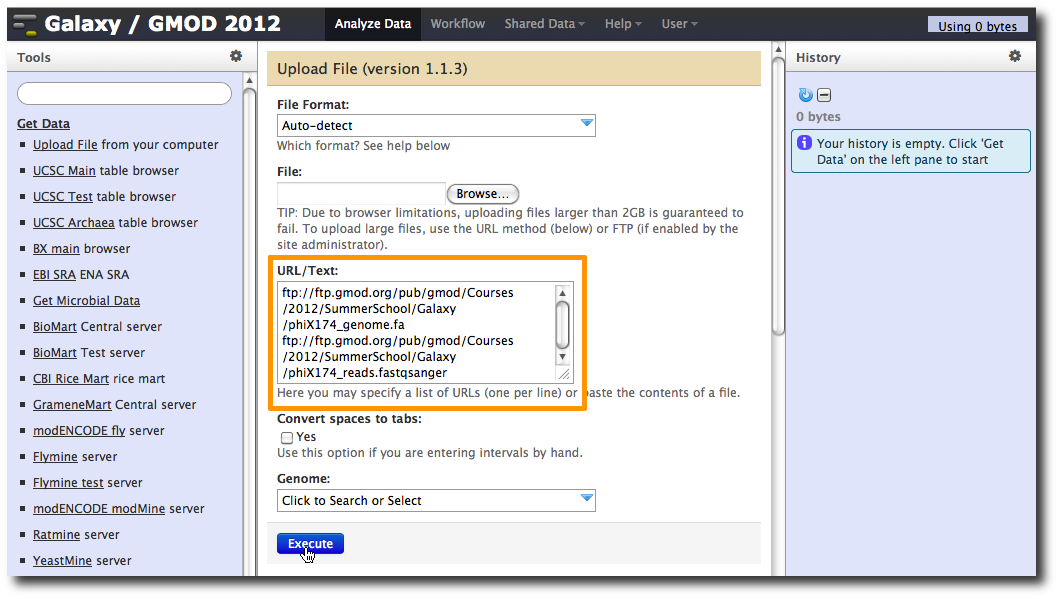
1. Upload datasets
We will again use the Get Data → Upload File tool to upload data into Galaxy. You can enter multiple URLs into the URL / Text box. Enter:
ftp://ftp.gmod.org/pub/gmod/Courses/2012/SummerSchool/Galaxy/phiX174_genome.fa
ftp://ftp.gmod.org/pub/gmod/Courses/2012/SummerSchool/Galaxy/phiX174_reads.fastqsanger
and click Execute:
After uploading the datasets, expand them in the History. We can see that Galaxy has successfully detected the file formats of both files.
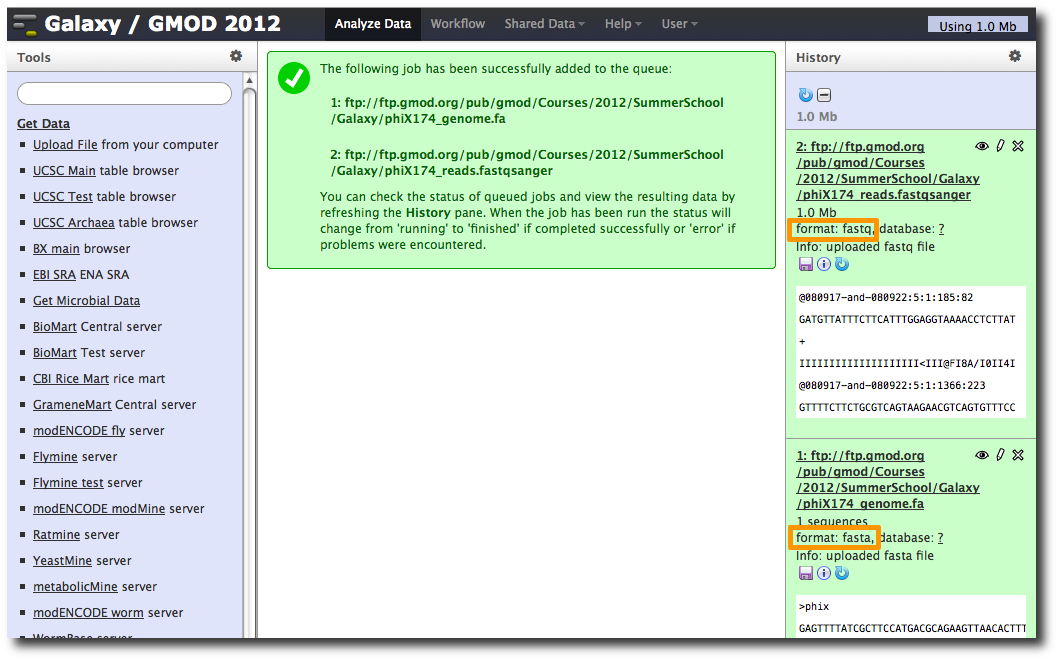
However, we need to make one modification. The FASTQ format is ill-defined, and Galaxy needs to know how the quality scores are scaled. Click the pencil icon for dataset 2, and change the datatype from fastq to fastqsanger (be careful, there are many similar choices here). Finally, click Save.
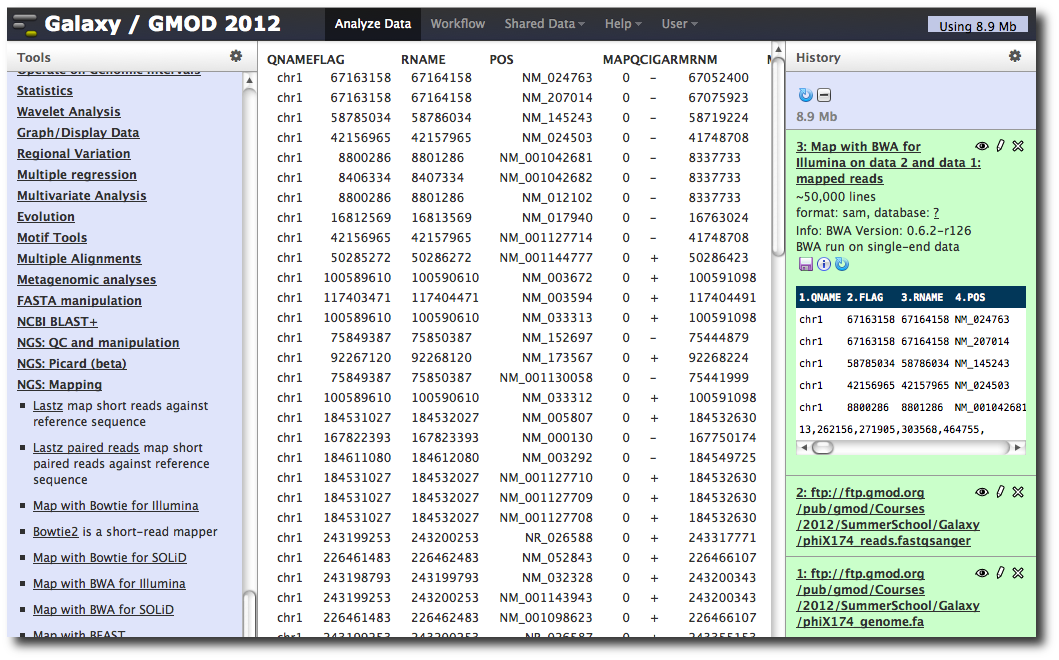
2. Run BWA to map reads
In the Tools panel, select NGS: Mapping → Map with BWA for Illumina.
Change the value of the first parameter to Use one from the history and make sure that 1: ftp: // ftp.gmod.or…4_genome.fa is selected.
Make sure that for parameter FASTQ file that 2: ftp: // ftp.gmod.or…fastqsanger is selected.
Click Execute.

A new dataset is generated containing the mapped reads in SAM format.
Making genome / alignment data available to Galaxy
Note: We probably won’t do this section during class, due to time constraints. The process for loading genome builds into Galaxy will also be changing shortly.
Galaxy is designed so that a single Galaxy instance can work with many genomes simultaneously. To use certain tools, Galaxy needs to be configured to know where to find data for those genomes. As an example, let’s create a new fake genome and configure some data for it.
Every genome in Galaxy needs to have a unique identifier (called the
build identifier or dbkey). For our example, the identifier will be
a_example_1.
Python package management tools
DO NOT DO THIS NOW: This has already been done on the AMI.
First, install a few packages that will allow us to index our data. At the terminal, enter:
$ sudo apt-get install python-dev python-setuptools python-pip
bx-python
Do not do this now either. This has already been done on your image.
This would install some support files needed by Python. Next type
$ sudo pip install bx-python
This would install the bx-python package, a collection of scripts and
Python libraries for working with genomic and comparative genomic data.
Get datasets for our genome
Now, we will download the datasets for our example genome:
$ mkdir tool-data/a_example_1
$ cd tool-data/a_example_1
$ wget ftp://ftp.gmod.org/pub/gmod/Courses/2012/SummerSchool/Galaxy/a_example_1.maf
$ wget ftp://ftp.gmod.org/pub/gmod/Courses/2012/SummerSchool/Galaxy/a_example_1.2bit
Note: These files are also available on the image in
/home/ubuntu/Galaxy/Data/.
Next, we will use the script maf_build_index.py (put in
/usr/local/bin/ when bx-python was installed) to create a binary
index that allows fast selection of alignments from a MAF file:
$ maf_build_index.py a_example_1.maf
$ ls
a_example_1.2bit  a_example_1.maf  a_example_1.maf.index
$ cd ~/Galaxy/galaxy-dist
Edit configuration files
We now need to edit several configuration files to inform Galaxy of the existence of our genome, and of these associated datasets.
NOTE: these are TAB separated files, and it is important that the tabs are in the right places. If you have trouble cutting and pasting from the wiki, you can cut and paste from this text file instead:
ftp://ftp.gmod.org/pub/gmod/Courses/2012/SummerSchool/Galaxy/info.txt
Add this line to tool-data/shared/ucsc/builds.txt
a_example_1 Example genome
Add this to tool-data/alignseq.loc
seq a_example_1 /home/ubuntu/Galaxy/galaxy-dist/tool-data/a_example_1/a_example_1.2bit
Add this to tool-data/maf_index.loc
a_example_1 with 3 other species a_example_1_3way a_example_1 a_example_1,apiMel2,n_vitripennis_20100409,dm3 /home/ubuntu/Galaxy/galaxy-dist/tool-data/a_example_1/a_example_1.maf
Now, stop and start your running Galaxy with
<Control-C>
$ sh run.sh --reload
Create dataset using new genome build
Now let’s see if our new data is available in Galaxy. Click Get Data → Upload File.
Paste the following into the URL/Text box:
scaffold0   450 650
scaffold0   2000    3000
Set the File Format to bed, make sure Convert spaces to tabs is selected, and click in the Genome: box. You should be able to find your genome by typing example.
Extract sequence corresponding to these intervals
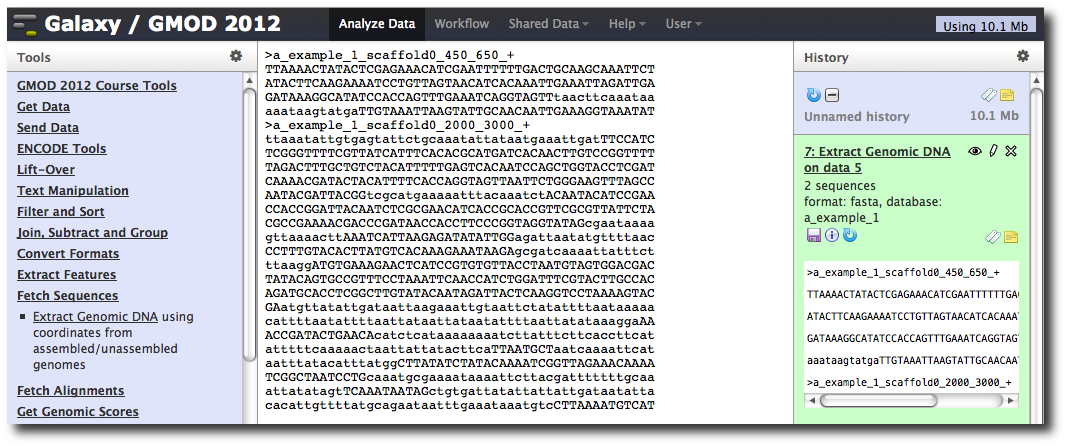
In the Tools menu, click Fetch Sequences → Extract Genomic DNA.
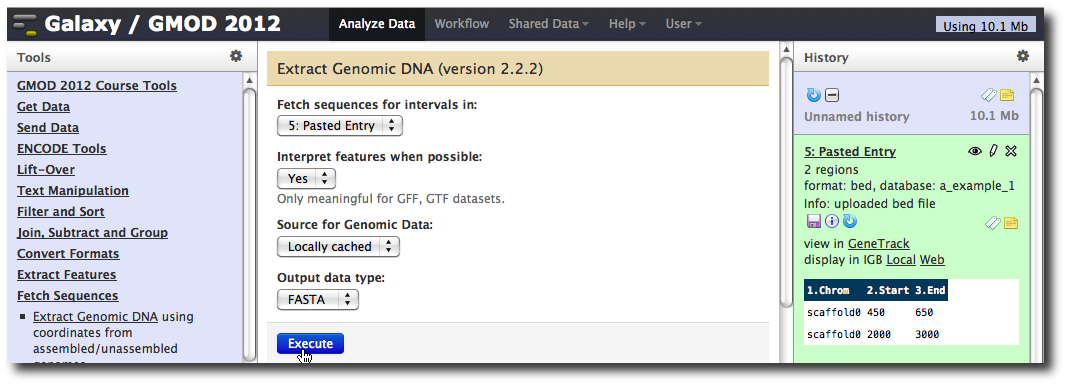
The tool interface should open in the main panel. The default values are probably fine (make sure the dataset you just created is selected). Click Execute. A new dataset will be created containing the DNA for your regions of interest.
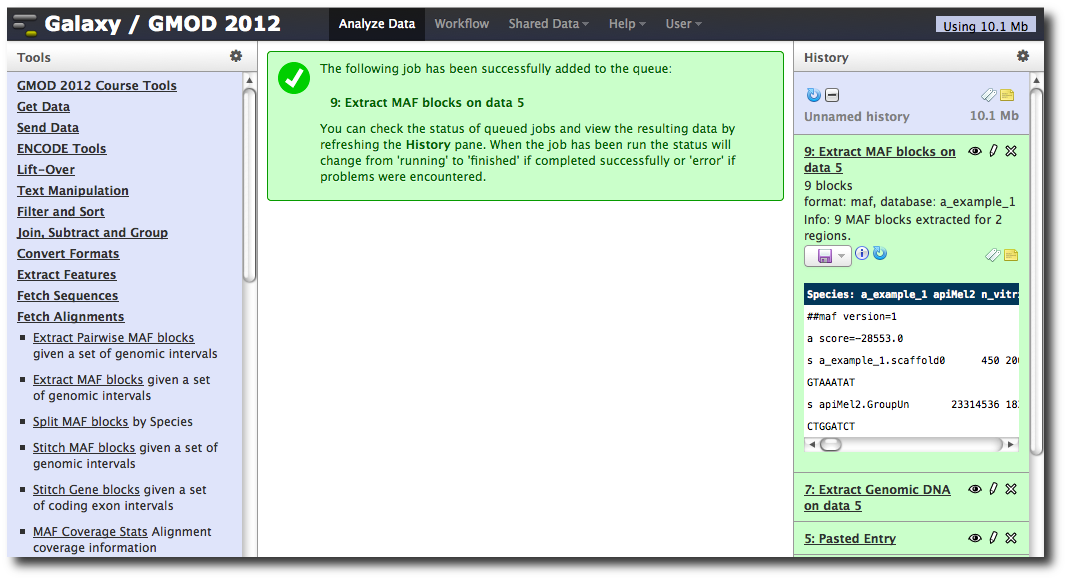
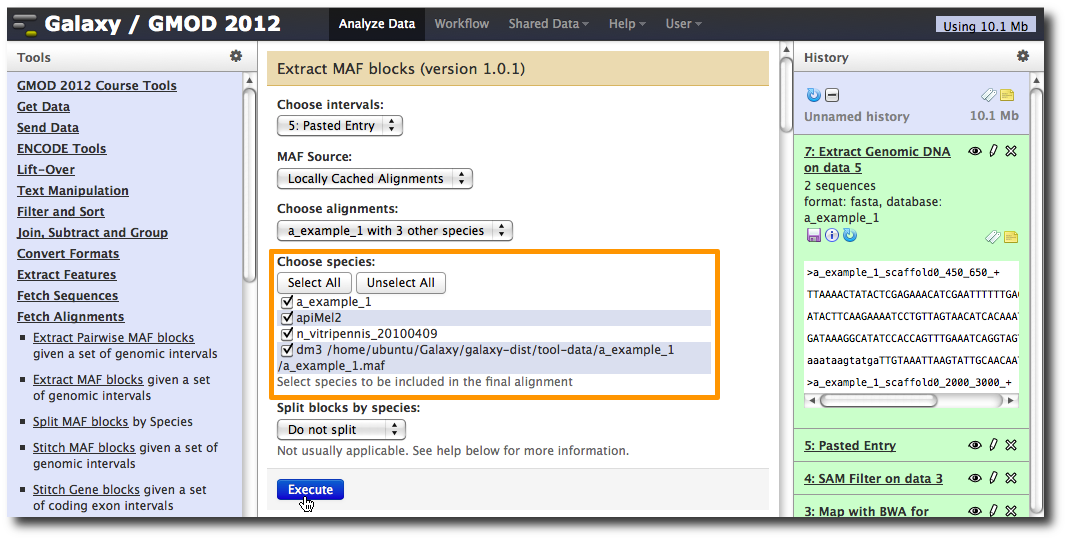
Extract multiple alignments corresponding to these intervals
In the Tools menu, click Fetch Alignments → Extract MAF Blocks.
The tool interface will open in the main panel. Again, the defaults should be reasonable, but click Select All to do alignments to all other species. Click Execute. A new dataset will be created containing alignments corresponding to your intervals of interest.